


6
operator safety.
34. Do not use the tool on any materials
containing asbestos.
35. Some material contains chemicals which may
be toxic. Take caution to prevent dust
inhalation and skin contact. Follow material
supplier safety data.
36. Always use the correct dust mask/respirator
for the material and application you are
working with.
37. Ensure that ventilation openings are kept clear
when working in dusty conditions. If it should
become necessary to clear dust, first
disconnect the tool from the mains supply
( use non metallic objects ) and avoid
damaging internal parts.
SAVE THESE INSTRUCTIONS.
WARNING:
DO NOT let comfort or familiarity with product
(gained from repeated use) replace strict adherence
to safety rules for the subject product. MISUSE or
failure to follow the safety rules stated in this
instruction manual may cause serious personal
injury.
FUNCTIONAL DESCRIPTION
CAUTION:
• Always be sure that the tool is switched off and
unplugged before adjusting or checking function on
the tool.
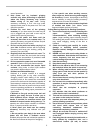
Switch action
1
2
008945
CAUTION:
• Before plugging in the tool, always check to see
that the switch trigger actuates properly and
returns to the "OFF" position when released.
To start the tool, simply pull the switch trigger. Release
the switch trigger to stop.
For continuous operation, pull the switch trigger and
then push in the lock button.
To stop the tool from the locked position, pull the switch
trigger fully, then release it.
ASSEMBLY
CAUTION:
• Always be sure that the tool is switched off and
unplugged before carrying out any work on the
tool.
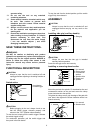
Installing side grip (auxiliary handle)
1
008949
CAUTION:
• Always be sure that the side grip is installed
securely before operation.
Screw the side grip on the tool securely.
Installing or removing abrasive disc
1
2
3
4
5
6
008948
Mount the pad onto the spindle. Fit the abrasive disc and
countersunk washer on the pad and screw the clamp
screw clockwise into the spindle.
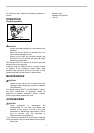
To tighten the clamp screw, grip the edge of the pad with
your hand, then tighten the screw clockwise with a hex
wrench securely.
1
2
008947
1. Hex wrench
2. Abrasive disc
1. Hex wrench
2. Clamp screw
3. Countersunk
washer
4. Abrasive disc
5. Plastic pad
6. Spindle
1. Side grip
1. Lock button
2. Switch trigger