


4
15. EXTENSION CORDS. Use only three-wire
extension cords which have three-prong
grounding-type plugs and three-pole
receptacles which accept the tool’s plug.
Replace or repair damaged or worn cord
immediately.
16. Do not operate the tool at no-load
unnecessarily.
SAVE THESE INSTRUCTIONS.
FUNCTIONAL DESCRIPTION
CAUTION:
• Always be sure that the tool is switched off and
unplugged before adjusting or checking function on
the tool.
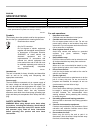
Switch action
1
2
008265
CAUTION:
• Before plugging in the tool, always check to see
that the switch trigger actuates properly and
returns to the "OFF" position when released.
To start the tool, simply pull the switch trigger. Release
the switch trigger to stop.
For continuous operation, pull the switch trigger and
then slide down the lock button.
To stop the tool from the locked position, pull the switch
trigger fully, then release it.
ASSEMBLY
CAUTION:
• Always be sure that the tool is switched off and
unplugged before carrying out any work on the
tool.
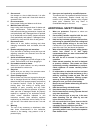
Installing or removing the bit
1
2
3
4
008266
With the notched portion on the shank of the bit facing
toward the tool retainer, insert the bit into the tool holder
as far as it will go. Then pull out and turn the tool retainer
180° to secure the bit. After installing, always make sure
that the bit is securely held in place by trying to pull it
out.
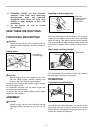
Side handle (auxiliary handle)
1
008267
The side handle swings around to either side, allowing
easy handling of the tool in any position.
OPERATION
Chipping/Scaling/Demolition
008268
Hold the tool firmly with both hands. Turn the tool on and
apply slight pressure on the tool so that the tool will not
bounce around, uncontrolled. Pressing very hard on the
tool will not increase the efficiency.
1. Side handle
1. Bull point
2. Notched portion
3. Tool retainer
4. Tool holder
1. Lock button
2. Switch trigger