


Repair
P 15 / 22
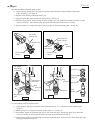
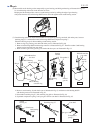
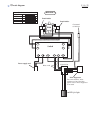
(6) Reassemble swash bearing section temporarily to gear housing, and hold gear housing as illustrated in Fig. 59.
So, swash bearing section tilts in the direction of arrow.
Keeping the illustrated position, remove swash bearing section by striking the edge of gear housing
with plastic hammer. So, ball bearing 606ZZ can be removed together with swash bearing section.
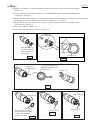
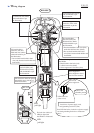
(7) Swash bearing section can not be disassembled in one action by pressing cam shaft with arbor press, because
retaining ring S-7 is mounted between ball bearing 606ZZ and compression spring 7.
Take the following steps for disassembling swash bearing section.
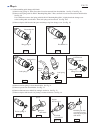
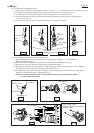
1. Remove ring 8 by pressing cam shaft with arbor press as illustrated in Fig. 60.
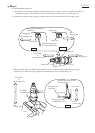
2. Remove ball bearing 608ZZ with bearing extractor as illustrated in Fig. 61. Then flat washer 8 and bearing
retainer can be removed from cam shaft.
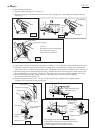
3. Remove helical gear 26 by pressing cam shaft with arbor press as illustrated in Fig. 62.
1R022 Bearing
extractor plate
1R023 Bearing
extractor ring
Ring 8
Ring 8
1R236 Round bar
for arbor
1R236 Round bar
for arbor
Ball bearing
608ZZ
Flat washer 8
Bearing
retainer
Helical
gear 26
Helical
gear 26
Swash
bearing 10
Clutch cam
Ball bearing
606ZZ
Retaining ring S-7
Compression
spring 7
Spur gear 10
Cam shaft
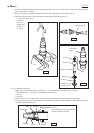
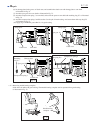
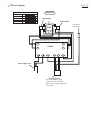
4. Remove swash bearing 10 and clutch cam as illustrated in Fig. 63. And remove ball bearing 606ZZ
with bearing extractor as illustrated in Fig. 63.
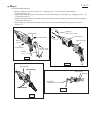
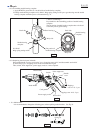
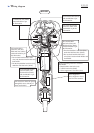
5. Disassemble retaining ring S-7 with retaining ring plier as illustrated in Fig. 64.
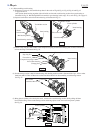
6. Separated compression spring 7 and spur gear 10 from cam shaft as illustrated in Fig. 65.
Fig. 59
Fig. 60
Fig. 61
Fig. 62
Fig. 63
Fig. 64
Fig. 65