


6
Hammering only
1
2
003134
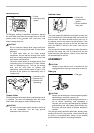
For chipping, scaling or demolition operations, depress
the lock button and rotate the change lever so that the
pointer points to the
symbol. Use a bull point, cold
chisel, scaling chisel, etc.
CAUTION:
• Do not rotate the change lever and/or shift lever
when the tool is running under load. The tool will be
damaged.
• To avoid rapid wear on the mode change
mechanism, be sure that the change lever and/or
shift lever is always positively located in one of the
three action mode positions.
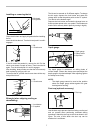
• The action mode cannot be changed directly from
"hammering only" to "rotation only" or from "rotation
only" to "hammering only". First set the change
lever and the shift lever to "rotation with
hammering" mode position shown in figure. Then
set them to the position for "hammering only" or
"rotation only".
1
2
3
003136
Torque limiter
The torque limiter will actuate when a certain torque level
is reached. The motor will disengage from the output
shaft. When this happens, the bit will stop turning.
CAUTION:
• As soon as the torque limiter actuates, switch off
the tool immediately. This will help prevent
premature wear of the tool.
Indicator lamp
1
2
003137
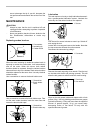
The green power-ON indicator lamp lights up when the
tool is switched ON. If the indicator lamp is lit but the tool
does not start, the carbon brushes may be worn out, or
the electric circuit or the motor may be defective. If the
indicator lamp does not light up and the tool does not
start, the ON/OFF switch or the mains cord may be
defective.
The red service indicator lamp lights up when the carbon
brushes are nearly worn out to indicate that the tool
needs servicing. After approx. 8 hours of use, the motor
will automatically be shut off.
ASSEMBLY
CAUTION:
• Always be sure that the tool is switched off and
unplugged before carrying out any work on the tool.
Side grip
1
003145
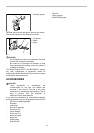
CAUTION:
• Always use the side grip to ensure operating safety
when drilling in concrete, masonry, etc.
• When the bit begins to break through concrete or if
the bit strikes reinforcing rods embedded in
concrete, the tool may react dangerously. Maintain
good balance and safe footing while holding the
tool firmly with both hands to prevent dangerous
reaction.
The side grip swings around to either side, allowing easy
handling of the tool in any position. Loosen the side grip
by turning it counterclockwise, swing it to the desired
position and then tighten it by turning clockwise.
1. Side grip
1. Power-ON
indicator lamp
(green)
2. Service indicator
lamp (red)
1. Hammering only
2. Rotation only
3. Rotation with
hammering
1. Pointer
2. Hammering only
symbol