


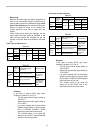

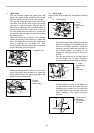

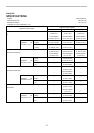
21
Example:
When cutting workpieces 115 mm (4-1/2")
and 120 mm (4 - 3/4") high, use a wood
facing with the following thickness.
Miter angle
Thickness of wood facing
0° 20 mm (13/16")
Left and Right 45°
Right 60°
Left and Right 52°
15 mm (9/16")
15 mm (9/16")
15 mm (9/16")
38 mm (1-1/2")
25 mm (1")
25 mm (1")
25 mm (1")
115 mm (4-1/2") 120 mm (4-3/4")
010050
CAUTION:
• Use screws to attach the wood facing to the guide
fence. The screws should be installed so that the
screw heads are below the surface of the wood
facing.
• When the wood facing is attached, do not turn the
turn base with the handle lowered. The blade
and/or the wood facing will be damaged.
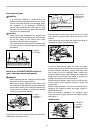
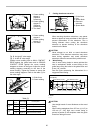
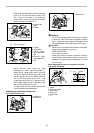
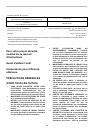
9. Groove cutting
1
001563
A dado type cut can be made by proceeding as
follows:
Adjust the lower limit position of the blade using
the adjusting screw and the stopper arm to limit the
cutting depth of the blade. Refer to "Stopper arm"
section described previously.
After adjusting the lower limit position of the blade,
cut parallel grooves across the width of the
workpiece using a slide (push) cut as shown in the
figure. Then remove the workpiece material
between the grooves with a chisel. Do not attempt
to perform this type of cut using wide (thick) blades
or with a dado blade. Possible loss of control and
injury may result.
CAUTION:
• Be sure to return the stopper arm to the original
position when performing other than groove
cutting.
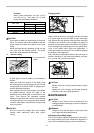
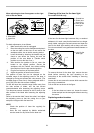
Carrying tool
1
009483
Make sure that the tool is unplugged. Secure the blade
at 0° bevel angle and the turn base at right miter angle
fully. Secure the slide poles so that the lower slide pole
is locked in the position of the carriage fully pulled to
operator and the upper poles are locked in the position
of the carriage fully pushed forward to the guide fence
(refer to the section titled "Slide lock adjustment ".)
Lower the handle fully and lock it in the lowered position
by pushing in the stopper pin.
Carry the tool by holding both sides of the tool base as
shown in the figure. If you remove the holders, dust bag,
etc., you can carry the tool more easily.
009506
CAUTION:
• Always secure all moving portions before carrying
the tool.
• Stopper pin is for carrying and storage purposes
only and not for any cutting operations.
MAINTENANCE
CAUTION:
• Always be sure that the tool is switched off and
unplugged before attempting to perform inspection
or maintenance.
WARNING:
• Always be sure that the blade is sharp and clean
for the best and safest performance.
Adjusting the cutting angle
This tool is carefully adjusted and aligned at the factory,
but rough handling may have affected the alignment. If
your tool is not aligned properly, perform the following:
1. Stopper pin
1. Cut grooves with
blade