


Fig
1
w
Warnings:
1.1 Soldering Iron contains
flainmabte
g@ (Butane) unLr pressure-use With care.
1.2 Do
MOT expe to heat above t50"C (t120DF) and avoid prolonged exposure to the sun.
1.3 Do NOT puncture or incinerate.
1.4 Excessive gas flow, flaming or catalyst pulsing red may occur
vffwn
the
regulator is
incorrectly adjusted, i.e.. set high. It is essential, therefore, to keep iron away from
face and body when igniting.
1.5
Do NOT refill, ignite or use near flame, heater, furnace or combustible materials.
1.6
KEEP WORK AREA CLEAN. Cluttered areas and benches invite injuries.
1.7 KEEP CHILDREN AWAY.
All
visitors should be kept away from work area.
1.8 STORE IDLE TOOLS.
When
flat in use, tools should he stored in dry, and high or
locked-up places out of rmch of children.
1.9
USE SAFETY GLASSES.
1.10 DON'T OVERREACH. Keep proper footing and
balance'at all times.
,
1.1
1 STAY ALERT. Watch what you are doing. Use common sense. Do not operate tool
when you are tired.
1.12 DO NOT TOUGH THE HEATED TIP OR BARREL OF THE SOLDERlNG IRON.
1.13
DO NOT leave operatinge?
Rot
soldering iron unalsended.
1.14 ALWAYS
BE
SURE THESOWERING IRON IS COOL BEFORE STORING IT.
1.15
DO NOT REPLACE CAP WmfOUT
WITGHJNG OFF AND WSURJNG TIP HAS COOLED. Do ensure flames are
extinwished before
ning
down.
If flame does not self extinguish within 30 seconds
a new
lip
is requlreP
1,16
Do
UI
Iran in a ventdated
%a.
1.17
Do
WT attemot to feadtust or reoair.
tttis
oroduct is not user serviceable.
tMR#4lM&
ThB
prbduct, when used tor soldkng and slmilar applicalions, produces
eM& lurown to the State of California to cause cancer and birth defects
or
other
repredwtive
Nrm.
WARMNG:
Tho
Department of Transportation Hazardous Material Regulations forbii
w~drage of butane or other flammable gas products on passenger aircraft.
DO
not pack
tht
ttSm
ar
any
other flammable gas item, in any checked or carry-on baggage.
Cont8fm flammable gas under pressure. Do not use near sparks or open flame.
I@
aOt
ptrnaltte
or lnclnerate container or store at temperatures above
120"
F.
Lep
aat
Pf
rcssch
of
children.
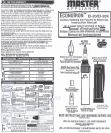
1.
Make sure the gas control ring
IS
In 'OFF position.
2. Hold refill
contalner above unit and press the container nozzle into gas refiller valve. (Fig 1)
3. Complete
fill takes about 10 seconds: then allow a few minutes for gas to stabilize.
I
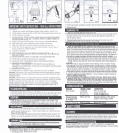
LIGHTING
o
1.
Push up. then turn the gas control ring clockwise to release a small amount of gas
(hissrng sound) through the burner. (Fig
2)
2. Use the lighter ~n cap (or lighter) to Ignite at the tip exhaust ports (or torch). (Fig 3
&
4)
I
ADJUSTMENT
1.
Temperature can be controtled by the gas control ring between low and high.
. .
Adjust the torch of flame to approx.
l/2
inch (12mm) length. Don't make the flame too
long, it w~ll only
waste
gas.
..
Adjust the ternp8rature fer soldering
(Also
hot knife
&
polyfoam cutter) to approx
1R
Posit~on. do not set the temperature too high on work that will cause the tip's catalyst
to burn.
1.
When finlshed 1~~~~
,..,
,-
YYc..,v.
I.lly
VII..Y.
..
.l-....--
."
.,,,
LIYI.
,,v~IIIYII
YllY
allow the tip (Torch) to cool before changing tips or storing.
Fig
6
2. Remove brass burner assembly and squirt 2 8hots of butw into orifice to
clear
any debris
3.
ReassemUe unit.
1.
Make sure the solder head and burner are not hot.
2.
Remove the burner
head
from
the
connector and Fen scm in the solder
head
with the
connector
and
then screw in (snug
fit)
any
small tlp (See Opllonal Accessories) you
need
fur your job. (Fig
5)
3.
Refnowe
tlle
solder head
from
the conneotor, and screw in the burner head, with
eolmmr
your
tool
can
now be used
as
a t~rch.
(FQ
6)
I
TIPS ON USING YOUR SOLDERING IRON
I
1. Select the proper solder for your application. Most solders sold today have the flux
inside their cores. When makina electric or electronic connections always use rosin core
solder. For mechanical joining where the surfaces can be washed after
Gldering acid core
solder can be used. Common nonplumbing solder is an alloy of tin and lead. A "60-40"
solder is 60% tin and 40% lead. General purpose solders
range from 40-60 to 60-40.
63-37 solder has the lowest melting temperature and highest strength. The diameter of
the solder wire should generally match the
slze of the components to be joined.
2.
Be
sure
the
surfaces to
be
joined are clean. Remove any oil or grease. Surfaces can be
thoroughly cleaned by using abrasives such as emery cloth, steel wool or by scraping
or filing. The flux in the solder will remove the oxide layers which could prevent good
bonding.
NOTE: New units are shipped untinned. Remove plating at end of tip before tinning.
3. BE SURE THE TIP OF THE
SOl.DERlNG IRON IS CLEAN AND,WELL TINNED (COATED
WITH SOLDER). The solder on the
ti0
of the iron w~ll melt raoldlv and create a
conductive
path for thehkt to;&$ the work$ece. A small additional 'ambunt of solder may be
added to the tip while it is in contact with the workpiece to ensure good heat conduction.
4. If possible connect the workpieces mechanically, or position them as rigidly as possible.
5. Allow the soldering iron to heat sufficiently:
1
minute minimum to about
3
minutes for
optimum operating temperature.
6. Apply the heated tip of the soldering iron directly to the work. Heat the work surfaces
sufficientlv for the solder to melt on them. Aoolv the solder to the work surface directlv.
Do not juit melt the solder on the tip of the irori allowing it to fall onto the work. This
'
will cause poor bonding between the solder and the surfaces to be joined. Remove the
iron
quickly after the solder flows on the work surfaces.
PROBLEM PROBABLE CAUSE CORRECTIONS
Does not ~gn~te LorviNo gas Ref~ll wlth butane gas
Gas pressure Rotate the regulator
too
hlgh or lovi
to lower or h~gher posltlon
Excessive
gas flow Sen~ng too hlgh Adjust the regulator to
'OFF'
pos~t~on
or Catalyst pulsing gradually reduce the gas volume
red to black
TIP does not heat up
Used up catalyst Replace w~th new t~p
SAFETY STAND
Put unit on stand when not in use.
I
Use
only
the
mlld soap and
a
damp
cloth
to clean
the
housings
ol
Ute
tool.
Many house-
hold cleaners
OORtain chemicals which could seriousiv damaoe
the
olastlc. Also do not use
--.~~
gasoline, turpentine. tacquer or paint thinner, dry cleaning fldds or bimilar products. Never
let any liquid get inside the tool: never immerse any part of the tool into a liquid.
1
IMPORTANT
I
To assure product SAFETY and RELIABILIN, repairs, maintenance, and adjustments
should be performed by Service
Centers or other qualified organlzatlons. This tool contains
I
CLEANING ORIFICE
For peak performance cleaning the orlfice
periodically
is recommended.
I
1. Turn ofl gas control. Make sure unit
IS
cool.
no customer serviceable components.