ENGLISHen
10
6.1 Locking the spindle
- Press in the spindle locking button (3) and turn the
spindle
(2) by hand until you feel the spindle locking
button engage.
6.2 Placing the grinding wheel in position
See illustration C on page 2.
- Fit the support flange (1) on the spindle. The
flange should not turn on the spindle when
properly attached.
- Place the grinding wheel on the support flange (1).
The grinding wheel must lay flat on the supporting
flange. The metal flange on the parting grinder
disc must lay flat on the support flange.
Note:
The support flange (1) is secured to prevent it
from falling off. To remove: use some force if
necessary.
6.3 Securing/releasing the clamping nut
Securing the clamping nut (15):
The 2 sides of the clamping nut are different. Screw
the clamping nut onto the spindle as follows:
See illustration D on page 2.
- A) For thin grinding wheels:
The edge of the clamping nut (15) faces upwards
so that the thin grinding wheel can be attached
securely.
B) For thick grinding wheels:
The edge of the clamping nut (15) faces
downwards so that the clamping nut can be
attached securely to the spindle.
- Lock the spindle. Turn the clamping nut (15)
clockwise using the 2-hole spanner (16) to
secure.
Releasing the clamping nut:
- Lock the spindle (see chapter 6.1). Turn the
clamping nut (15) anticlockwise using the 2-hole
spanner (16) to unscrew.
7.1 Switching On and Off
Always guide the machine with both hands.
Switch on first, then guide the
accessory
towards the workpiece.
The machine must not be allowed to draw in
additional dust and shavings. When switching
the machine on and off, keep it away from dust
deposits. After switching off the machine, only place
it down when the motor has come to a standstill.
Avoid switching on the machine accidentally:
always switch it off when the battery pack is
removed from the machine.
In continuous operation, the machine
continues running if it is forced out of your
hands. Therefore, always hold the machine with
both hands using the handles provided, stand in a
safe position and concentrate.
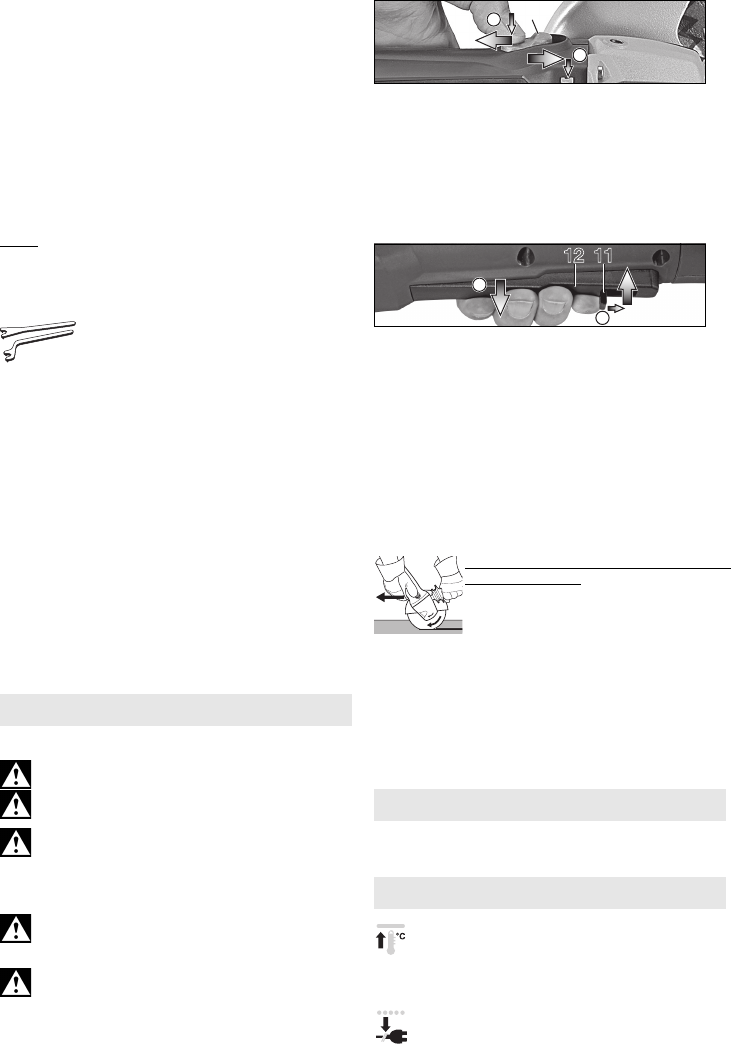
Machines with slide switch:
Switching on: Push the slide switch (4) forward.
For continuous activation, now tilt
downwards until it engages.
Switching off: Press the rear end of the slide
switch (4) and release.
Machines with Paddle Switch
(with dead man function):
(machines with the designation WP...)
Switching on: Slide the switch-on lock (11) in
the direction of the arrow and press
the trigger (12).
Switching off: Release the trigger (12).
7.2 Working instructions
Grinding:
Press down the machine evenly on the surface and
move back and forth so that the surface of the
workpiece does not become too hot.
Roughing: position the machine at an angle of 30° -
40° for the best working results.
Cutting-off:
Always work against the run of the disc
(see illustration). Otherwise there is
the danger of the machine kicking
back from the cut out of control. Guide
the machine evenly at a speed
suitable for the material being processed. Do not tilt,
apply excessive force or sway from side to side.
Sanding:
Press down the machine evenly on the surface and
move back and forth so that the surface of the
workpiece does not become too hot.
Wire brushing:
Press down the machine evenly.
Clean the dust filter regularly: remove and clean
with a jet of compressed air.
The electronic signal display (5) lights up
and the load speed decreases. The
temperature is too high! Run the machine in
idling until the electronics signal indicator switches
off.
The electronic signal display (5) flashes
and the machine does not start. The restart
protection is active. The machine will not start
7. Use
8. Cleaning
9. Troubleshooting
0
I
4
0
I
12 11


