


6
7
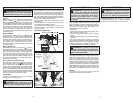
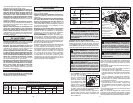
WARNING High rotational force. To
reduce the risk of injury, always hold or brace
securely. Always use side handle on tools.
Bit Binding
A high rotational force occurs when a bit binds. If
the bit binds, the tool will be forced in the opposite
direction of the bit rotation. Bits may bind if they are
misaligned or when they are breaking through a
hole. Wood boring bits can also bind if they run into
nails or knots. Be prepared for bit binding situations.
To reduce the chance of bit binding:
• Use sharp bits. Sharp bits are less likely to bind
when drilling.
• Use the proper bit for the job. There are bits that
are designed for specifi c purposes.
• Use caution when drilling pitchy, knotty, wet or
warped material or when drilling in material that
may contain nails.
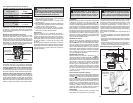
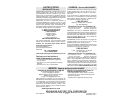
Typical Bracing Methods
APPLICATIONS
WARNING To reduce the risk of elec-
tric shock, check work area for hidden pipes
and wires before drilling or driving screws.
Drilling in Wood, Composition Materials and
Plastic
When drilling in wood, composition materials and
plastic, select the
drill-only operating mode.
Start the drill slowly, gradually increasing speed as
you drill. When drilling into wood, use wood augers
or twist drill bits. Always use sharp bits. When using
twist drill bits, pull the bit out of the hole frequently
to clear chips from the bit fl utes. To reduce the
chance of splintering, back work with a piece of
scrap wood. Select low speeds for plastics with a
low melting point.
Drilling in Metal
When drilling in metal, select the
drill-only
operating mode. Use high speed steel twist drills
or hole saws. Use a center punch to start the hole.
Lubricate drill bits with cutting oil when drilling in
iron or steel. Use a coolant when drilling in nonfer-
rous metals such as copper, brass or aluminum.
Back the material to prevent binding and distortion
on breakthrough.
Drilling in Masonry
When drilling in masonry, select the hammer-
drill operating mode. Use high speed carbide-tipped
bits. Drilling soft masonry materials such as cinder
block requires little pressure. Hard materials like
concrete require more pressure. A smooth, even
fl ow of dust indicates the proper drilling rate. Do not
let the bit spin in the hole without cutting. Do not
use water to settle dust or to cool bit. Both actions
will damage the carbide.
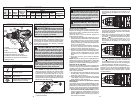
Driving Screws and Nut Running
Drill a pilot hole when driving screws into thick or
hard materials. Select the
driving operating
mode. Set the torque selector collar to the proper
position and set the speed to low. Use the proper
style and size screwdriver bit for the type of screw
you are using. With the screwdriver bit in the screw,
place the tip of the screw on the workpiece and ap-
ply fi rm pressure before pulling the trigger. Screws
can be removed by reversing the motor.
Overloading
Continuous overloading may cause permanent
damage to tool or battery pack.
Forward
rotation
Reaction
Bracing against the fl oor
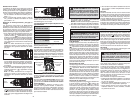
Bracing
against
a stud
Forward
rotation
Bracing
against your
leg
Reaction
Reaction
Fig. 6
Fig. 8
Fig. 7
Reverse
rotation
Forward
rotation
Reaction
ACCESSORIES
For a complete listing of accessories refer to your
MILWAUKEE Electric Tool catalog or go online
to www.milwaukeetool.com. To obtain a catalog,
contact your local distributor or service center.
WARNING Always remove battery pack
before changing or removing accessories.
Only use accessories specifi cally recommend-
ed for this tool. Others may be hazardous.
Maintaining Tool
Keep your tool, battery pack and charger in good
repair by adopting a regular maintenance program.
After six months to one year, depending on use,
return the tool, battery pack and charger to A
MILWAUKEE service facility for:
• Lubrication
• Mechanical inspection and cleaning (gears, spin-
dles, bearings, housing, etc.)
• Electrical inspection (battery pack, charger,
motor)
• Testing to assure proper mechanical and electrical
operation
If the tool does not start or operate at full power
with a fully charged battery pack, clean the contacts
on the battery pack. If the tool still does not work
properly, return the tool, charger and battery pack,
to a MILWAUKEE service facility for repairs.
MAINTENANCE
Cleaning
Clean dust and debris from charger and tool vents.
Keep tool handles clean, dry and free of oil or
grease. Use only mild soap and a damp cloth to
clean the tool, battery pack and charger since certain
cleaning agents and solvents are harmful to plastics
and other insulated parts. Some of these include
gasoline, turpentine, lacquer thinner, paint thinner,
chlorinated cleaning solvents, ammonia and house-
hold detergents containing ammonia. Never use
fl ammable or combustible solvents around tools.
Repairs
For repairs, return the tool, battery pack and
charger to the nearest service center.
WARNING To reduce the risk of per-
sonal injury and damage, never immerse your
tool, battery pack or charger in liquid or allow
a liquid to fl ow inside them.
WARNING To reduce the risk of injury,
always unplug the charger and remove the
battery pack from the charger or tool before
performing any maintenance. Never disas-
semble the tool, battery pack or charger.
Contact a MILWAUKEE service facility for
ALL repairs.