


page 5
WARNING!
To reduce the risk of injury, always unplug
tool before attaching or removing accessories
or making adjustments. Use only specifically
recommended accessories. Others may be
hazardous.
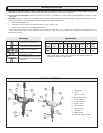
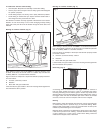
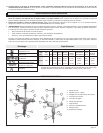
Installing Bits into Morse Taper Sockets (Fig. 2)
Pipe Handle
Thread pipe handle into the threaded hole in the motor housing.
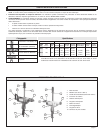
A No. 3 Morse Taper Socket is furnished as standard equipment on
Super Hole-Shooter Cat. No. 2404-1. Before inserting the drill bit, be
sure its taper matches the socket taper. To insert drill bit, push the shank
of the bit firmly into the socket. This is all that is necessary to properly
seat the bit for drilling. Always keep the taper shanks clean, free of
nicks and coated with a film of oil.
To remove the bit from the socket, unscrew the knurled taper socket
cap and pull out the bit and the socket. Once removed, the bit can be
gently knocked free with a soft metal mallet. Replace the socket and the
knurled cap.
Bit Selection
• Use sharp bits. Sharp bits are less likely to bind when drilling.
• Use the proper bit for the job. There are many types of bits designed
for specific purposes. Check the information on the bit's packaging
for proper usage.
• Do not use bits larger than the rated capacity of the drill. Gear
damage or motor overload may result (see "Specifications").
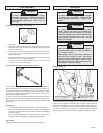
Installing Bits into Keyed Chucks (Fig. 1)
1. Unplug tool.
2. Open the chuck jaws wide enough to insert the bit. Be sure the bit
shank and chuck jaws are clean. Dirt particles may prevent the bit
from lining up properly.
3. Insert the bit into the chuck. Center the bit in the chuck jaws and lift
it about 1/16" off of the bottom. Then, tighten the chuck jaws by
hand to align the bit.
4. Place the chuck key in each of the three holes in the chuck, turning
it clockwise as shown. Tighten securely.
5. To remove the bit, insert the chuck key into one of the holes in the
chuck and turn it counterclockwise.
Fig. 2
Fig. 1
TOOL ASSEMBLY
OPERATION
WARNING!
To reduce the risk of injury, wear safety goggles
or glasses with side shields. Unplug the tool
before changing accessories or making adjust-
ments.
WARNING!
To reduce the risk of personal injury when
drilling, always hold tool by the insulated grip-
ping surfaces when performing an operation
where the cutting tool may contact hidden wiring
or its own cord. Contact with a "live" wire will
make exposed metal parts of the tool "live" and
shock the operator.
WARNING!
When drilling, always brace the drill against a
solid fixed object (such as a stud) in preparation
for a sudden reaction.
When drilling, never use your body to brace drill.
Never put your hands (or other body parts)
between the part of the drill being braced and the
object it is being braced against. Hands (or other
body parts) that are in the path of the reaction can
be pinched, crushed or broken.
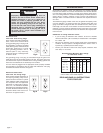
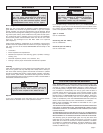
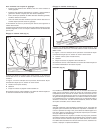
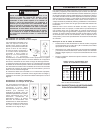
Bit binding (Fig. 3)
If the bit binds, the drill will suddenly react in the opposite direction of the
rotation of the bit. Figure 3 shows the path of reaction, (B) if the drill bit
binds while being driven in forward (A).The operator should reduce the
chances of a sudden reaction by following the instructions listed below.
The operator should also prepare for a sudden reaction by holding
securely using the pipe handle or bracing against a solid fixed object.
B
A
Fig. 3