


6
ACCESSORIES
For a complete listing of accessories refer to your
MILWAUKEE Electric Tool catalog or go online
to www.milwaukeetool.com. To obtain a catalog,
contact your local distributor or service center.
WARNING Alwaysremovebattery
packbeforechangingorremovingac-
cessories.Onlyuseaccessoriesspecically
recommendedforthistool.Othersmaybe
hazardous.
MaintainingTool
Keep your tool, battery pack and charger in good re-
pair by adopting a regular maintenance program.
After six months to one year, depending on use,
return the tool, battery pack and charger to a
MILWAUKEE service facility for:
• Lubrication
• Mechanical inspection and cleaning (gears,
spindles, bearings, housing, etc.)
• Electrical inspection (battery pack, charger,
motor)
• Testing to assure proper mechanical and
electrical operation
If the tool does not start or operate at full power
with a fully charged battery pack, clean the contacts
on the battery pack. If the tool still does not work
properly, return the tool, charger and battery pack,
to a MILWAUKEE service facility for repairs.
MAINTENANCE
Cleaning
Clean dust and debris from charger and tool vents.
Keep tool handles clean, dry and free of oil or grease.
Use only mild soap and a damp cloth to clean the
tool, battery pack and charger since certain cleaning
agents and solvents are harmful to plastics and other
insulated parts. Some of these include gasoline,
turpentine, lacquer thinner, paint thinner, chlorinated
cleaning solvents, ammonia and household deter-
gents containing ammonia. Never use ammable or
combustible solvents around tools.
Repairs
For repairs, return the tool, battery pack and char-
ger to the nearest service center.
WARNING Toreducetheriskofper-
sonalinjuryanddamage,neverimmerseyour
tool,batterypackorchargerinliquidorallow
aliquidtoowinsidethem.
WARNING Toreducetheriskofinjury,
alwaysunplugthechargerandremove
thebatterypackfromthechargerortool
beforeperforminganymaintenance.Never
disassemblethetool,batterypackorcharger.
ContactaMILWAUKEEservicefacilityforALL
repairs.
TriggerLock
To lock the trigger, push the Trigger Lock to the
right. The trigger will not work while the switch
is in the locked position. Always lock the trigger
and remove the battery pack before performing
maintenance and when changing accessories.
Lock the trigger when storing the tool and when
the tool is not in use.
StartingandStopping
1. To start the tool, grasp the handle rmly and pull
the trigger.
NOTE: The LED is turned on when the trigger
is pulled.
2. To stop the tool, release the trigger. Allow the tool
to come to a complete stop before removing the
blade from a partial cut or laying the tool down.
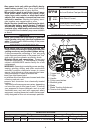
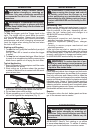
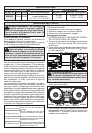
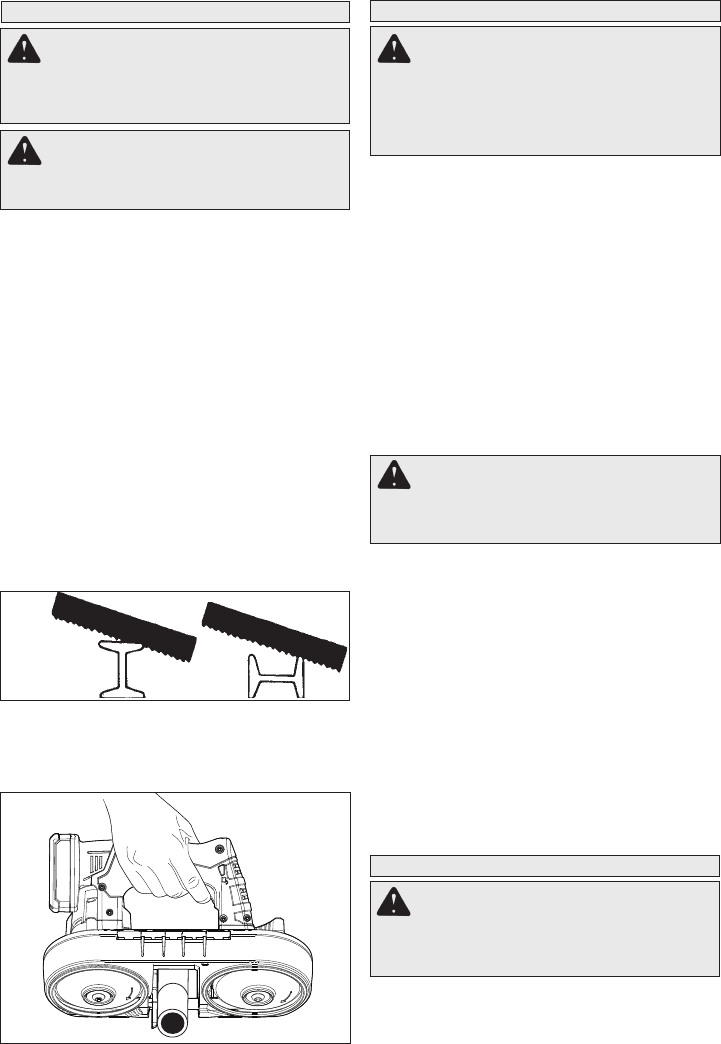
TypicalApplication
1. Keep the blade off the workpiece until the motor
has reached full speed.
2. Start cutting on a surface where the greatest
number of teeth will be in contact with the work-
piece at one time.
Correct Incorrect
OPERATION
WARNING Alwaysremovebattery
packbeforechangingorremovingac-
cessories.Onlyuseaccessoriesspecically
recommendedforthistool.Othersmaybe
hazardous.
WARNING Toreducetheriskofinjury,
wearsafetygogglesorglasseswithside
shields.Keephandsawayfromthebladeand
allmovingparts.
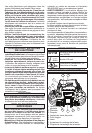
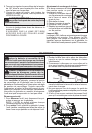
3. Place the material guide against the workpiece
and lower the moving saw blade into the cut.
4. Do not bear down while cutting.
5. When completing a cut, hold the tool rmly so it
will not fall against the workpiece (Fig. 3).