


4
5
FUNCTIONAL DESCRIPTION
SYMBOLOGY
SPECIFICATIONS
Cat. No. Volts DC Max PEX-A Diameter Expander Heads Lubricant
2432-20 12 3/8" - 1"
3/8" - 1" MILWAUKEE M12
™
ProPEX
™
or Uponor Standard
Expander Cone
Grease
Cat.No. 49-08-2400
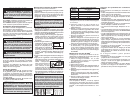
Direct Current
Underwriters Laboratories, Inc.
United States and Canada
SPECIFIC SAFETY RULES
• Use power tools only with specifi cally desig-
nated battery packs. Use of any other battery
packs may create a risk of injury and fi re.
• When battery pack is not in use, keep it away
from other metal objects like paper clips,
coins, keys, nails, screws, or other small metal
objects that can make a connection from one
terminal to another. Shorting the battery termi-
nals together may cause burns or a fi re.
• Under abusive conditions, liquid may be eject-
ed from the battery; avoid contact. If contact
accidentally occurs, fl ush with water. If liquid
contacts eyes, additionally seek medical help.
Liquid ejected from the battery may cause irritation
or burns.
SERVICE
• Have your power tool serviced by a qualifi ed
repair person using only identical replacement
parts. This will ensure that the safety of the power
tool is maintained.
• Use tool only to expand PEX-a material. Other
materials may split or crack, causing leaking.
ASSEMBLY
WARNING Recharge only with the char-
ger specifi ed for the battery. For specifi c charg-
ing instructions, read the operator’s manual
supplied with your charger and battery.
Inserting/Removing the Battery
To remove the battery, push in the release buttons
and pull the battery pack away from the tool.
To insert the battery, slide the pack into the body of
the tool. Make sure it latches securely into place.
Changing Expander Heads
To remove an expander head, unscrew from tool
counterclockwise.
To install an expander head, screw onto tool clock-
wise. Hand tighten securely. Do not over tighten.
The expander head must fi t snuggly against the
shoulder of the tool.
Fuel Gauge
To determine the amount of charge left in the bat-
tery, pull the trigger. The Fuel Gauge will light up
for 2-3 seconds.
To signal the end of charge, 1 light on the fuel gauge
will fl ash for 2-3 seconds.
Trigger Lock
To lock
the trigger, push the trigger lock from the
left side of the tool. The trigger will not work while the
switch is in the locked position. Lock the trigger when
storing the tool and when the tool is not in use.
To unlock the trigger, push the trigger lock from
the right side of the tool.
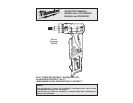
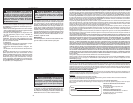
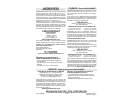
1. Expander head
2. Trigger
3. Trigger lock
4. LED
5. Fuel gauge
6. Belt hook
7. Expander cone
2
1
4
3
OPERATION
WARNING To reduce the risk of injury,
wear safety goggles or glasses with side
shields.
WARNING Always remove battery
pack before changing or removing acces-
sories. Only use accessories specifically
recommended for this tool. Others may be
hazardous.
5
CAUTION Improper lubrication (too much
or too little) may result in faulty connections,
which could result in property damage.
CAUTION Use only MILWAUKEE M12
™
ProPEX
™
expander heads or Uponor Stan-
dard expander heads. The use of incorrectly
sized expansion heads may result in faulty
connections, which could result in property
damage.
Making PEX Tubing Connections
To ensure a proper connection:
Remove the expander head and remove any dirt •
and debris.
Use a clean, lint-free cloth to apply a thin •
coat of MILWAUKEE Expander Cone Grease
Cat.No. 49-08-2400 to the expander cone. Do
not over-lubricate.
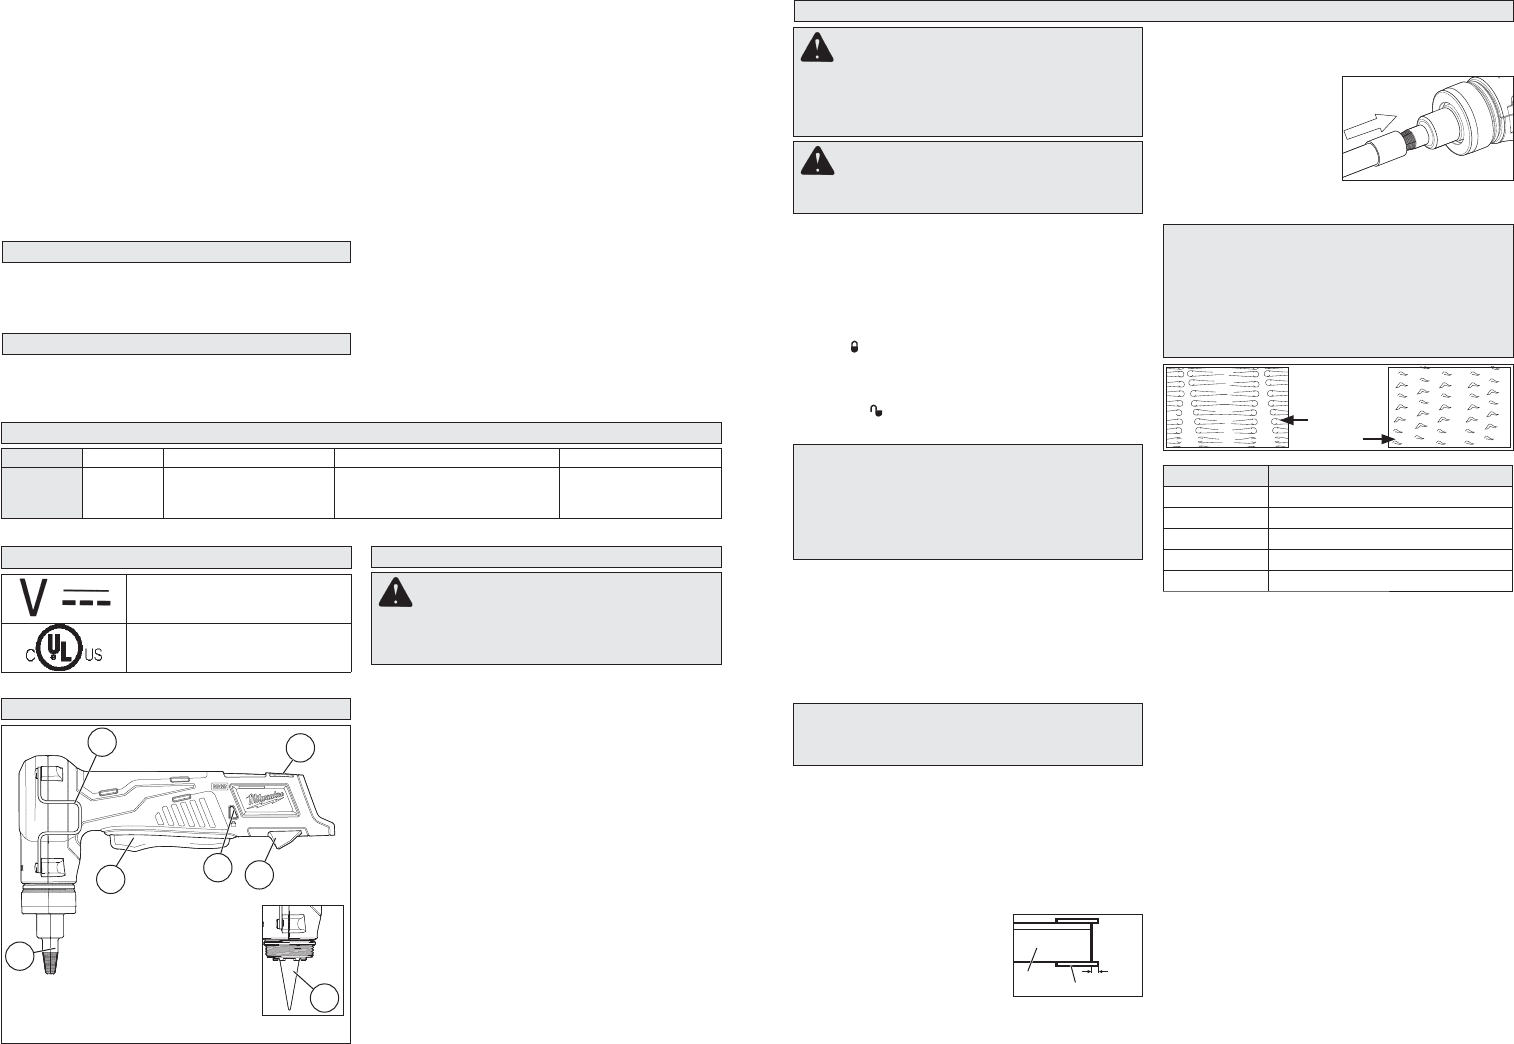
CAUTION When using Uponor Standard
expansion heads, properly rotate the tubing
after each expansion to create even, smooth
expansion marks. Not rotating the tubing may
cause deep grooves and faulty connections,
which could result in leaking and property
damage.
Continue until the tubing and ring are fl ush with 5.
the expander head shoulder.
Remove the tubing when the segments are 6.
contracted and release the trigger. To avoid
over-expanding the tubing, do not keep tool in
the expanded position with tubing in place.
Wipe excess grease from inside tubing.7.
Slide the tubing over the fi tting until it is fl ush with 8.
the fi tting shoulder. Connection may be tight. If
unable to slide tubing over the fi tting, remove
from fi tting and expand one additional time.
Tubing should fi t tight against the fi tting shoulder. 9.
If more than 1/16" gap between tubing and shoul-
der, cut 2" off the end of the tubing and restart
procedure with a new ProPEX
™
Ring.
Ring Size Number of Expansions with Ring*
3/8" PEX 6-7
1/2" PEX 7-8
5/8" PEX 9-10
3/4" PEX 11-12
1" PEX 17-18
* Fewer or more expansions may be necessary, as
infl uenced by weather and technique.
• Store tool with expander head installed to
protect expander cone from damage.
• Keep fi ngers away from expander head during
use. When expander head contracts, pinching can
occur.
• Maintain labels and nameplates. These carry
important information. If unreadable or missing,
contact a MILWAUKEE service facility for a free
replacement.
• WARNING: Some dust created by power sanding,
sawing, grinding, drilling, and other construction
activities contains chemicals known to cause
cancer, birth defects or other reproductive harm.
Some examples of these chemicals are:
•lead from lead-based paint
•crystalline silica from bricks and cement and other
masonry products, and
• arsenic and chromium from chemically-treated
lumber.
Your risk from these exposures varies, depending
on how often you do this type of work. To reduce
your exposure to these chemicals: work in a well
ventilated area, and work with approved safety
equipment, such as those dust masks that are spe-
cially designed to fi lter out microscopic particles.
Insert the expander head into the PEX tubing. 3.
Pull the trigger. The expander head will expand, 4.
retract, and rotate slightly in each cycle.
NOTE: When Uponor
Standard expander
heads are used, the
head will NOT rotate
automatically. Each
time the segments
contract, gently push
the tubing up onto the expander head and rotate
1/8 turn in either direction.
Do not expand tubing beyond the tool's capac-•
ity (1").
Pull trigger and verify that the expander head is •
rotating after each cycle when using MILWAUKEE
M12
™
ProPEX
™
expander heads.
Cut the PEX tubing to the needed length. Use 1.
only cutters designed for PEX tubing. Make
sure the cut is perpendicular to the length of
the tubing.
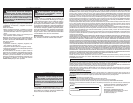
Slide the ProPEX2.
™
Ring over
the end of the tubing until it
butts aginst the ring stop.
If the ring does not have a
stop, leave an over-hang of
no more than 1/16". When using 3/8" ProPEX
™
,
refer to "3/8" ProPEX
™
Rings" for proper as-
sembly.
7
ring
1/16"
tubing
Expansion
markings
inside tubing
Incorrect
Correct
6