


4
5
Symbology
• Hold power tool by insulated gripping surfaces
when performing an operation where the cut-
ting tool may contact hidden wiring or its own
cord. Contact with a “live” wire will also make
exposed metal parts of the tool “live” and shock
the operator.
• Use clamps or another practical way to secure
and support the workpiece to a stable platform.
Holding the work by hand or against your body
leaves it unstable and may lead to loss of control.
• Maintain labels and nameplates. These carry
important information. If unreadable or missing,
contact a MILWAUKEE service facility for a free
replacement.
• WARNING Some dust created by power sanding,
sawing, grinding, drilling, and other construction
activities contains chemicals known to cause
cancer, birth defects or other reproductive harm.
Some examples of these chemicals are:
• lead from lead-based paint
• crystalline silica from bricks and cement and other
masonry products, and
• arsenic and chromium from chemically-treated
lumber.
Your risk from these exposures varies, depending
on how often you do this type of work. To reduce
your exposure to these chemicals: work in a well
ventilated area, and work with approved safety
equipment, such as those dust masks that are spe-
cially designed to fi lter out microscopic particles.
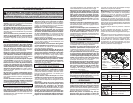
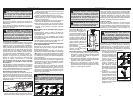
Direct Current
No Load Strokes per Minute (SPM)
Underwriters Laboratories, Inc.
United States and Canada
Cat. No.
Volts
DC
No Load Strokes
Per Minute
Length of
Stroke
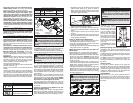
2625-20 18 0 - 3000 3/4”
1. Shoe
2. Quik-Lok™
blade clamp
3. LED
4. Trigger
5. Handle
6. Trigger lock
2
1
5
4
3
6
FUNCTIONAL DESCRIPTION
SPECIFICATIONS
SPECIFIC SAFETY RULES
• Use power tools only with specifi cally desig-
nated battery packs. Use of any other battery
packs may create a risk of injury and fi re.
• When battery pack is not in use, keep it away
from other metal objects like paper clips,
coins, keys, nails, screws, or other small metal
objects that can make a connection from one
terminal to another. Shorting the battery termi-
nals together may cause burns or a fi re.
• Under abusive conditions, liquid may be eject-
ed from the battery; avoid contact. If contact
accidentally occurs, fl ush with water. If liquid
contacts eyes, additionally seek medical help.
Liquid ejected from the battery may cause irritation
or burns.
SERVICE
• Have your power tool serviced by a qualifi ed
repair person using only identical replacement
parts. This will ensure that the safety of the power
tool is maintained.
ASSEMBLY
WARNING Recharge only with the
charger specifi ed for the battery. For
specifi c charging instructions, read the opera-
tor’s manual supplied with your charger and
battery.
Inserting/Removing the Battery
To remove the battery, push in the release buttons
and pull the battery pack away from the tool.
To insert the battery, slide the pack into the body of
the tool. Make sure it latches securely into place.
WARNING Always remove battery
pack before changing or removing ac-
cessories. Only use accessories specifi cally
recommended for this tool. Others may be
hazardous.
Selecting a Blade
The Quik-Lok
®
Blade Clamp can be used with
all 1/2” shank universal Hackzall
®
and Sawzall
®
blades. Use MILWAUKEE blades for best perfor-
mance. When selecting a blade, choose the right
type and length. Many types of blades are available
for a variety of applications: cutting metal, wood,
nail-embedded wood, scroll cutting, roughing-in,
and contours.
Many lengths are also available. Choose a length
long enough to extend beyond the shoe and your
work throughout the stroke. Do not use blades
less than 3-1/2” long since they won’t extend
beyond the shoe throughout the stroke.
For best performance and longest life, see your
MILWAUKEE Electric Tool catalog or go online to
www.milwaukeetool.com to select the best blade
for the job.
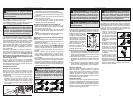
Installing and Removing Blades from the
Quik-Lok
®
Blade Clamp
Remove battery pack before changing blades.
Make sure the spindle and blade clamp areas are
clean. Metal chips and sawdust may prevent the
Quik-Lok
®
Blade Clamp from clamping securely.
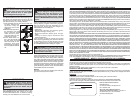
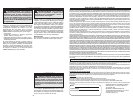
Fig. 1
HACKZALL
Blade clamp
Blade
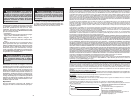
Trigger Lock
To lock the trigger,
push the trigger lock as
shown.The trigger will
not work while the switch
is in the locked position.
Always lock the trigger
and remove the battery
pack before performing
maintenance and chang-
ing accessories. Lock the
trigger when storing the
tool and when the tool is
not in use.
To unlock the trigger,
push the trigger lock as
shown.
Starting, Stopping and Controlling Speed
To start the tool, grasp the handle fi rmly and pull
the trigger. An LED is turned on when the trigger
is pulled.
To vary the speed, increase or decrease the pres-
sure on the trigger. The further the trigger is pulled,
the greater the speed.
To stop the tool, release the trigger. Make sure
the blade comes to a complete stop before re-
moving the blade from a partial cut or laying the
tool down.
General Cutting
For straight or contour cutting from an edge, line
the blade up with your cutting line. Before the blade
contacts the workpiece, grasp the handle fi rmly
and pull the trigger. Then guide the tool along your
cutting line. Always hold the shoe fl at against the
workpiece to avoid excessive vibration.
Cutting Metals
Begin cutting at a slow speed, gradually increas-
ing speed as you cut. When cutting into metals or
hard materials that can not be cut from an edge,
drill a starting hole larger than the widest part of
the blade.
2. Release collar and the spring loaded mechanism
will clamp the blade fi rmly in place.
3. Twist collar in the opposite direction of the ar-
row to ensure that the blade is locked into the
clamp.
4. Tug on blade to make sure it is securely locked
in place.
5. To remove a blade, twist collar in the direction of
the arrow while pulling on the blade. Be careful
when handling hot blades.
Quik-Lok
®
Blade Clamp Maintenance
• Periodically clean dust and debris from the Quik-
Lok
®
Blade Clamp with dry compressed air.
• If the collar resists twisting, twist the collar back
and forth to shake debris loose.
• Periodically lubricate Quik-Lok
®
Blade Clamp with
a dry lubricant such as graphite.
Removing broken blades from the Quik-Lok
®
Blade Clamp
Broken blades can be removed by the following:
• Remove battery pack before removing blades.
• Point the tool downward, twist the collar, and shake
the tool up and down (DO NOT turn the tool on
while your fi ngers are holding the blade clamp
open). The shank of the broken blade should drop
out of the clamp.
• If shaking the tool doesn't work - In most cases, a
corner of the broken blade will extend beyond the
blade clamp. Twist the collar and pull the broken
blade out of the clamp by this corner.
• If the broken stub doesn't extend far enough to be
grabbed by its corner, use a thin blade with small
teeth (such as a metal cutting blade) to hook the
blade that is jammed in the clamp while twisting
the collar and pull it out.
1. Depending on the job, the blade may be inserted
with the teeth facing up or down. To install a
blade, twist collar in the direction of the arrow
while inserting the blade into the clamp until the
tang butts against the collar.
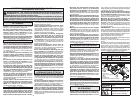
WARNING To reduce the risk of injury,
be sure the blade always extends beyond
the shoe and workpiece throughout the
stroke. Blades may shatter if they impact the
workpiece or shoe).
Stroke
Fig. 2
Fig. 3
Push for
Unlock
Push for
Lock
OPERATION
WARNING Always remove battery
pack before changing or removing ac-
cessories. Only use accessories specifi cally
recommended for this tool. Others may be
hazardous.
WARNING To reduce the risk of injury,
wear safety goggles or glasses with side
shields.