


page 6
Maintaining Tools
Keep your tool in good repair by adopting a regular maintenance pro-
gram. Before use, examine the general condition of your tool. Inspect
guards, switches, tool cord set and extension cord for damage. Check
for loose screws, misalignment, binding of moving parts, improper mount-
ing, broken parts and any other condition that may affect its safe opera-
tion. If abnormal noise or vibration occurs, turn the tool off immediately
and have the problem corrected before further use. Do not use a dam-
aged tool. Tag damaged tools “DO NOT USE” until repaired
(see “Repairs”).
Under normal conditions, relubrication is not necessary until the motor
brushes need to be replaced. After six months to one year, depending on
use, return your tool to the nearest MILWAUKEE service facility for the
following:
• Lubrication
• Brush inspection and replacement
• Mechanical inspection and cleaning (gears, spindles, bearings,
housing, etc.)
• Electrical inspection (switch, cord, armature, etc.)
• Testing to assure proper mechanical and electrical operation
MAINTENANCE
Cleaning
Clean dust and debris from vents. Keep the tool handles clean, dry and
free of oil or grease. Use only mild soap and a damp cloth to clean your
tool since certain cleaning agents and solvents are harmful to plastics
and other insulated parts. Some of these include: gasoline, turpentine,
lacquer thinner, paint thinner, chlorinated cleaning solvents, ammonia
and household detergents containing ammonia. Never use flammable or
combustible solvents around tools.
OPERATION
WARNING!
To reduce the risk of injury, wear safety goggles
or glasses with side shields. Unplug the tool
before changing accessories or making
adjustments.
WARNING!
To reduce the risk of injury, always unplug
your tool before performing any maintenance.
Never disassemble the tool or try to do any
rewiring on the tool's electrical system. Contact
a MILWAUKEE service facility for ALL repairs.
WARNING!
To reduce the risk of injury, electric shock and
damage to the tool, never immerse your tool in
liquid or allow a liquid to flow inside the tool.
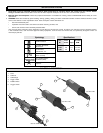
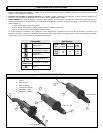
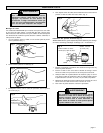
Grinding
Always hold the grinder firmly before starting the motor. To start the
motor for Cat. No. 5192, turn the toggle switch ON. To start Cat. No. 5194,
press the paddle switch. For Cat. No. 5196, pull the trigger.
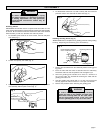
Using the Trigger Lock Mechanism (Cat. No. 5196)
The lock button holds the trigger in the ON position for continuous full
speed use.
1. To lock the trigger, hold the lock button in while pulling the trigger,
then release the trigger.
2. To unlock the trigger, pull the trigger and release. The lock button will
pop out.
Allow the motor to reach full speed and then place the grinding point on
the work surface. The tool is designed to work most efficiently with only
light pressure. Excessive pressure will burn the work surface, damage
the grinding point, bend the mandrel, and cause slow grinding.
When a grinding point becomes dull, the grinder may start to vibrate.
When this happens immediately stop using the grinding point. Vibra-
tion could loosen the collet, causing the grinding point to fly off the tool.
Replace a dull grinding point with a new one or use a dressing stone to
sharpen the dull point. Handle grinding points carefully. Dropping them or
dropping the grinder could cause the point to shatter. Do not operate the
grinder carelessly because it may cause the grinding point to explode at
high speeds.
If the grinder begins vibrating, immediately stop
the motor and check to see if the grinding point
is dull. Dull grinding points will cause the tool to
vibrate and could force the collet to fly off the
tool. Always replace or sharpen dull grinding
points.
WARNING!
Repairs
If your tool is damaged, return the entire tool to the nearest service
center.