


22
23
WARNING To reduce the risk of
personal injury and damage to the tool or
work:
• Always use the “hammering-only” setting to
set the anchor. Never use the “hammering-
with-rotation” setting to set the anchor.
• Never switch the tool to “hammering-with-
rotation” until after the anchor has been
set and the tooth anchor chuck has been
removed from the anchor.
Setting Self-Drilling Anchors (5317-59/59A only)
MILWAUKEE Tooth Anchor Chucks require a “B”
taper adapter.
1. Place the proper size tooth anchor chuck into
the “B” taper adapter. Then insert the “B” taper
adapter into the tool and lock it into place as
described. See “Installing Bits and Chisels”.
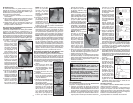
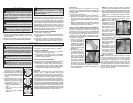
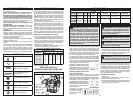
2. Insert the anchor
into the tooth an-
chor chuck. Set
the knob for ham-
mering only. Set
the anchor on your
mark and hammer
until the teeth have
penetrated the con-
crete.
3. Set the knob for
hammering with
rotation and drill un-
til the chuck is 1/8"
above the concrete.
NOTE: It may be
necessary to clean
dust and cuttings
from the anchor
several times while
drilling the hole.
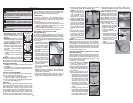
4. Remove the anchor
from the hole while
the tool is running.
Clean the dust and
cuttings from the
anchor by pointing it downward and turning the
tool on and off several times. Clean the dust out
of the hole with a vacuum cleaner or blowout bulb.
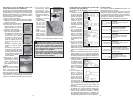
5. Place the expan-
sion plug into the
anchor and insert
the anchor into the
hole. Switch the
knob back to ham-
1/8"
mering only, and
hammer the anchor
fi rmly into the hole.
6. Snap the head off
of the anchor. To
remove the head of
anchors up to 5/8",
grasp the handles
fi rmly and pull the
tool sharply to-
wards you or snap
off the anchor head with a hand hammer as
shown. The anchor is now ready to receive a
bolt.
7. To remove the anchor head wedged in the tooth
anchor chuck, use drift pin 48-86-0100.
8. To remove the tooth anchor chuck, remove the
“B” taper adapter from the nose of the tool. Insert
the drift pin supplied with the adapter into the
hole on the side of the “B” taper adapter and
strike it sharply to force out the tooth anchor
chuck.
Chiseling and Chipping
MILWAUKEE Rotary Hammers may be used for
chipping and chiseling.
When chiseling, hold the tool at an angle to the
workpiece. Work from a corner or close to the edge
of the workpiece, breaking off one small area at a
time rather than attempting too large an area.
A variety of accessories are available.
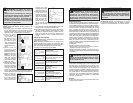
Scaling Chisels
For removing weld spatter or
scale and cutting straight lines.
Bushing Tools
Used to surface concrete.
Mortar Cutting Chisels
(Seam Tools)
For removing old mortar for tuck
pointing or caulking.
Bull Points
For demolition work and starting
holes in concrete slabs.
Flat Chisels
For edging, chipping or
channeling.
Slotting Chisel
For slotting and cutting between
drilled holes in concrete and
masonry.
MAINTENANCE
Maintaining Tools
Keep your tool in good repair by adopting a regular
maintenance program. Before use, examine the gen-
eral condition of your tool. Inspect guards, switches,
tool cord set and extension cord for damage. Check
for loose screws, misalignment, binding of moving
parts, improper mounting, broken parts and any
other condition that may affect its safe operation. If
abnormal noise or vibration occurs, turn the tool off
immediately and have the problem corrected before
further use. Do not use a damaged tool. Tag damaged
tools “DO NOT USE” until repaired (see “Repairs”).
Under normal conditions, relubrication is not neces-
sary until the motor brushes need to be replaced.
After six months to one year, depending on use,
return your tool to the nearest MILWAUKEE service
facility for the following:
• Lubrication
• Brush inspection and replacement
• Mechanical inspection and cleaning (gears,
spindles, bearings, housing, etc.)
• Electrical inspection (switch, cord, armature, etc.)
• Testing to assure proper mechanical and electrical
operation
Cleaning
Clean dust and debris from vents. Keep the tool
handles clean, dry and free of oil or grease. Use
only mild soap and a damp cloth to clean your tool
since certain cleaning agents and solvents are
harmful to plastics and other insulated parts. Some
of these include: gasoline, turpentine, lacquer thin-
ner, paint thinner, chlorinated cleaning solvents,
ammonia and household detergents containing
ammonia. Never use fl ammable or combustible
solvents around tools.
Repairs
If your tool is damaged, return the entire tool to the
nearest service center.
WARNING To reduce the risk of
injury, always unplug your tool before
performing any maintenance. Never disas-
semble the tool or try to do any rewiring
on the tool’s electrical system. Contact a
MILWAUKEE service facility for ALL repairs.
WARNING To reduce the risk of injury,
electric shock and damage to the tool, never
immerse your tool in liquid or allow a liquid
to fl ow inside the tool.
ACCESSORIES
For a complete listing of accessories refer to your
MILWAUKEE Electric Tool catalog or go on-line
to www.milwaukeetool.com. To obtain a catalog,
contact your local distributor or a service center.
WARNING To reduce the risk of injury,
always unplug the tool before attaching or
removing accessories. Use only specifi cally
recommended accessories. Others may be
hazardous.