


page 6
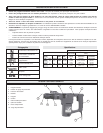
TOOL ASSEMBLY
To reduce the risk of injury, always unplug tool before
attaching or removing accessories or making adjustments.
Use only specifically recommended accessories. Others
may be hazardous.
WARNING!
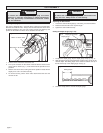
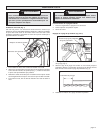
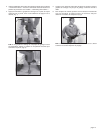
Installing Bits (Fig. 1)
This tool is designed with a universal drive system that accepts SDS,
SDS Plus and Hilti TE-C bits. Always clean and lubricate the shank of the
bit before installing it into your tool to help prevent heat build-up and
protect the bit shank from wear due to abrasive concrete dust.
1. Pull the chuck collar back toward the tool.
2. Line up the recesses on the shank of the bit with the marks on the
chuck collar as shown (Fig. 1). Insert the bit into the spindle as far as
possible.
3. Release the chuck collar, locking the bit into position. Rotate the bit
slightly to be sure it is locked securely.
4. To remove the bit, pull the chuck collar back toward the tool and
remove the bit.
Adjusting the Side Handle
1. Loosen the side handle slightly by unscrewing it counterclockwise.
2. Rotate the side handle to the required angle.
3. Tighten the side handle securely.
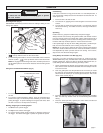
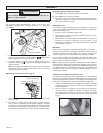
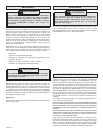
Setting the Depth Gauge (Fig. 2 & 3)
To reduce the risk of injury, always use a side handle when
using this tool. Always brace or hold securely.
WARNING!
1. To adjust the depth gauge, flip the depth gauge clamp up (Fig. 2).
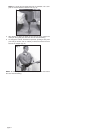
2. Slide the depth gauge rod backward or forward until it is set for the
desired depth. The drilling depth is the distance between the tip of
the bit and the tip of the depth gauge rod (Fig. 3).
Fig. 3
Drilling Depth
3. Press the clamp down to secure the depth gauge.
Fig. 1
Recesses in bit shank
Marks on chuck collar
Fig. 2
Depth gauge
Depth gauge clamp