


page 5
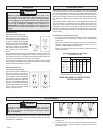
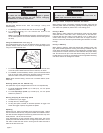
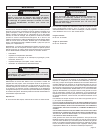
Installing Bits into Keyed Chucks (Fig. 2)
Be sure that the shank of the bit and the chuck jaws are clean. Dirt
particles may cause the bit to line up improperly. Do not use bits larger
than the maximum recommended capacity of the drill because gear dam-
age or motor overloading may result. For best performance, be sure that
the bits are properly sharpened before use.
Fig. 2
Loosen
Tighten
1. Unplug the tool.
2. Open the chuck jaws wide enough to insert a bit. Allow the bit to
strike the bottom of the chuck. Center the bit in the chuck jaws and
tighten the jaws by hand to align the bit.
3. Place the chuck key into each of the three holes in the chuck, turning
it clockwise to tighten the chuck securely.
NOTE: Never use a wrench or means other than a chuck key to tighten
or loosen the chuck.
4. To remove the bit, insert the chuck key into one of the holes in the
chuck and turn it counterclockwise.
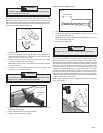
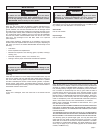
Adjusting the Side Handle Position (Fig. 3)
1. Loosen the side handle by unscrewing the side handle grip until the
side handle rotates freely.
2. Rotate the side handle to the desired position.
3. Tighten the side handle grip securely.
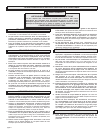
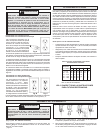
Fig. 4
Drilling Depth
1. Press in the clamping lever (Fig. 3).
2. Slide the depth gauge rod backward or forward until it is set
for the desired depth (Fig. 4).
NOTE: The drilling depth is the distance between the tip of the bit and
the tip of the depth gauge rod.
3. Release the clamping lever.
To reduce the risk of injury, always use a side handle when
using this tool. Always brace or hold securely.
WARNING!
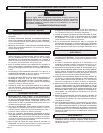
Fig. 3
Side handle
grip
Clamping lever
To prevent personal injury, always remove the chuck key
from the chuck after each use.
WARNING!
Setting the Depth Gauge (Fig. 4)
To reduce the risk of injury, always wear eye protection.
WARNING!
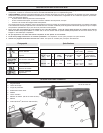
Chuck Removal (Fig. 5)
This tool is equipped with a threaded spindle to hold the chuck. Before
removing the chuck, unplug the tool and open the chuck jaws. A left-
handed thread screw is located inside the chuck to prevent the chuck
from loosening when the tool is operated in reverse direction. Remove
the screw by turning it clockwise. To remove the chuck, hold the tool so
that only the side of the chuck rests firmly and squarely on a solid
workbench. Insert the chuck key or a chuck remover bar in one of the
keyholes. Turn the chuck so the key is at about a 30° angle to the bench
top and strike the key sharply with a hammer so the chuck turns in a
counterclockwise direction (looking from the front of the tool). This should
loosen the chuck from the spindle which has a right hand thread making
it easy to remove the chuck by hand.
NOTE: When replacing the chuck, always replace the left hand thread
screw in the chuck.
Fig. 5