


page 7
Impact Protection System (Select Models)
Select models are equipped with a unique patented gearing system that
provides efficient power transmission and extended life in the most
difficult cutting applications. This durable system will absorb impacts,
blade lock ups, and motor stalls. These models can be used for extreme
cutting applications such as large diameter pipe, thick metal, pallets, and
heavy demolition and renovation work as well as for general purpose
cutting.
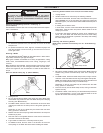
Starting, Stopping and Controlling Speed
1. To start the tool, grasp the handle firmly and pull the trigger.
2. To stop the tool, release the trigger. Allow the tool to come to a
complete stop before removing the blade from a partial cut or laying
the tool down.
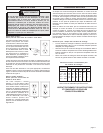
Trigger Speed Control Switch
MILWAUKEE Sawzalls
®
are equipped with a trigger speed control switch.
It may be operated at any speed from zero strokes per minute to full
speed. Always start tool before blade contacts the workpiece. To vary
the speed, simply increase or decrease the pressure on the trigger. The
further the trigger is pulled, the greater the speed. To stop the tool,
release the trigger and allow the tool to stop completely before removing
from a partial cut or before laying the tool down.
General Cutting
For straight or contour cutting from an edge, line the blade up with your
cutting line. Before the blade contacts the workpiece, grasp the handle
firmly and pull the trigger. Then guide the tool along your cutting line.
Always hold the shoe flat against the workpiece to avoid excessive
vibration.
Cutting Metals
Begin cutting at a slow speed, gradually increasing speed as you cut.
When cutting into metals or hard materials that can not be cut from an
edge, drill a starting hole larger than the widest part of the blade. Extend
blade life by using a solid blade cutting lubricant such as MILWAUKEE
Band Saw Blade Lubricant Cat. No. 49-08-4206.
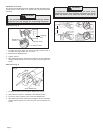
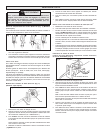
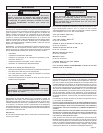
Plunge Cutting (Fig. 7)
Your MILWAUKEE Sawzall
®
is ideal for plunge cutting directly into sur-
faces that can not be cut from an edge, such as walls or floors. Plunge
cutting may be done two ways depending on how the blade is inserted.
Column A shows how to plunge cut with the teeth of the blade facing
down. Column B shows how to plunge cut with the teeth of the blade
facing up. Do not plunge cut into metal surfaces (see Cutting Metals).
1. Insert the blade into the tool.
If you inserted the blade with the teeth facing downward, hold the
tool as shown in Column A, resting the edge of the shoe on the
workpiece.
If you inserted the blade with the teeth facing upward, hold the tool
as shown in Column B, resting the edge of the shoe on the work-
piece as shown.
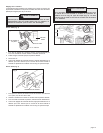
2. With the blade just above the workpiece, pull the trigger. Using the
edge of the shoe as a pivot, lower the blade into the workpiece as
shown.
3. As the blade starts cutting, raise the handle of the tool slowly until
the shoe rests firmly on the workpiece. Then guide the tool along
your cutting line to acquire the desired cut.
NOTE: To make plunge cutting easier, use a heavy gauge blade and
install the blade with the teeth facing upward as shown in Column B.
WARNING!
To reduce the risk of explosion, electric shock and property
damage, always check the work area for hidden gas pipes,
electrical wires or water pipes when making blind or plunge
cuts.
Fig. 7
OPERATION
WARNING!
To reduce the risk of injury, wear safety goggles or glasses
with side shields. Unplug the tool before changing accesso-
ries or making adjustments.