


10 11
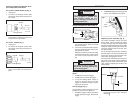
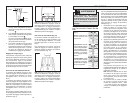
If the tool or screw are misaligned,
the screw will not drive into the work
surface or it will not drive straight.
2. Pull the trigger and push the tool forward
with a “punching” motion to sink the
screw into the drywall. A punching mo-
tion will engage the snap-action clutch,
cause the screw to start rotating, sink
the screw and disengage the snap-ac-
tion clutch within a fraction of a second.
If pressure is not maintained on the tool
after engaging the snap-action clutch,
the screw will not properly seat.
The snap-action clutch will automatically
disengage and the insert bit will stop
rotating once the screw has been driven
to the selected depth.
These screwdrivers feature a snap-ac-
tion clutch, which may ratchet slightly
when the screw is sunk to the selected
depth.
NOTE: Practice driving screws into
pieces of scrap material to become
familiar with the tool and the snap-
action clutch action before attempting to
drive screws into the workpiece.
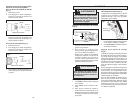
3. To remove screws, remove the loca-
tor assembly and switch the forward/
reverse switch to the reverse position.
Reattaching the locator assembly will
not change the depth setting.
1. Select the proper drywall screw for each
job. Pilot holes are not needed. To insert
screws, place the screw onto the insert
bit, then align the screw against the work
surface, making sure to hold the tool and
screw square to the work surface.
APPLICATIONS
WARNING
To reduce the risk of explosion,
electric shock and property dam-
mage. always check the work area
for hidden pipes and wires before
drilling.
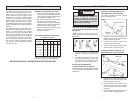
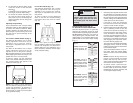
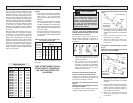
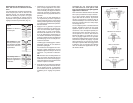
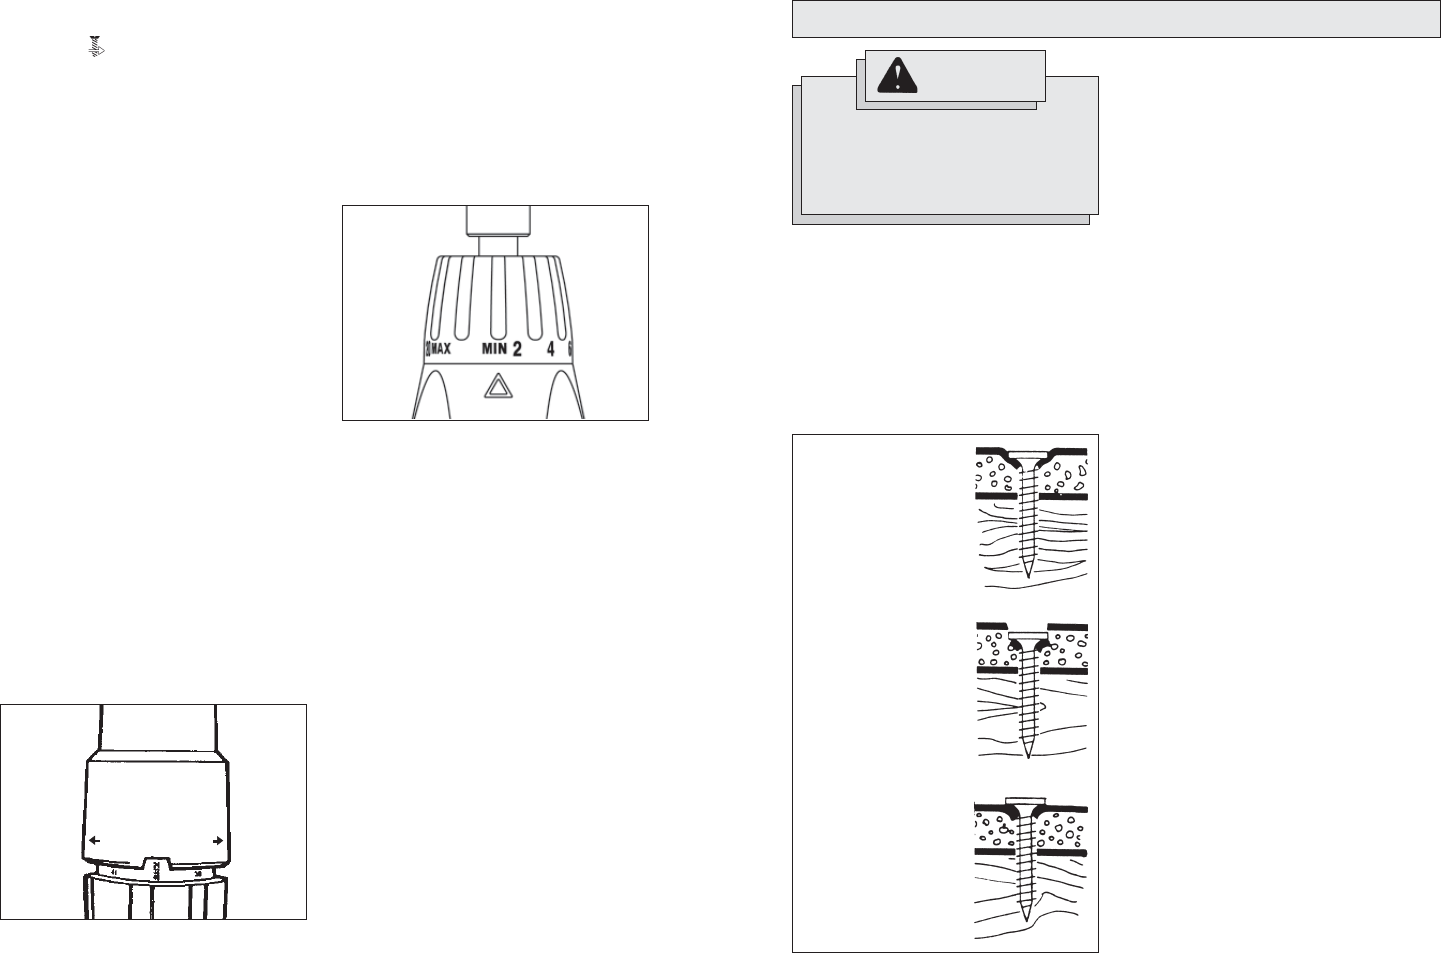
Driving Drywall Screws (Fig. 11)
For Screwdrivers Rated 0-4000 RPM
Standard drywall screws are generally
designed for attaching drywall to wood
studs and 26 through 20-gauge steel studs.
MILWAUKEE Screwdrivers are ideal for
driving these types of drywall screws. The
depth setting is very important. Refer to the
guide below for the correct depth setting
(Fig. 11).
Correct. Head of screw
is below surface, but
does not puncture fac-
ing.
Too deep. Head of
screw punches hole in
drywall surface, making
finishing difficult and
allowing moisture be-
neath facing. Decrease
depth.
Too shallow. Head of
screw extends above
drywall face and can
not be finished off.
Increase depth.
Fig. 11
Adjusting Torque Setting
These screwdrivers have a torque setting
adjustment collar for driving different types
of screws into different materials. When
properly adjusted, the clutch will slip at a
preset torque to prevent driving the screw
too deep and to prevent damage to the
screw or tool.
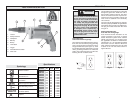
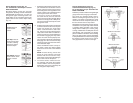
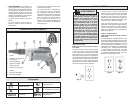
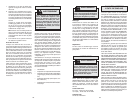
For Cat. Nos. 6580-20 & 6581-20 (Fig. 9)
The 6580-20 Screwdriver has a torque
setting adjustment collar that may be
adjusted to one of forty-four settings.
The torque is adjustable from 10 to 140
inch-pounds.
The 6581-20 Screwdriver has a torque
setting adjustment collar that may be
adjusted to one of thirty-three settings.
Beyond setting thirty-three, the tool will stall
before slipping the clutch. The torque is ad-
justable from 10 to 110 inch-pounds.
To select a setting, turn the adjustment
collar in the direction indicated on the tool.
The selected setting will appear in the
window as shown (Fig. 9).
HIGHER -TORQUE - LOWER
SETTING
Fig. 9
2. To decrease the driving depth, simply
rotate the locator in the direction
labeled .
The detents “lock” the locator in place,
ensuring an accurate depth setting.
3. To remove the locator assembly, turn
the ramp-off sleeve while pulling it
away from the tool. Reattaching the
locator assembly will not change the
depth setting.
NOTE: Use a piece of scrap material to
test the different settings before driving
screws into workpiece. To determine a
specifi c setting for your application, use a
torque wrench to check the correct torque
at any particular setting.
NOTE: Use a piece of scrap material to
test the different settings before driving
screws into workpiece. To determine a
specifi c setting for your application, use a
torque wrench to check the correct torque
at any particular setting.
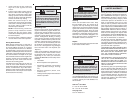
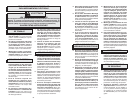
For Cat. No. 6780-20 (Fig. 10)
The 6780-20 Screwdriver has a torque
setting adjustment collar that may be
adjusted to one of twenty-one settings.
The torque is adjustable from 10 to 140
inch-pounds.
To select a setting, turn the adjustment
collar on the tool. The selected setting
will appear above the arrow as shown
(Fig. 10).
Fig. 10