


When disconnecting the charger, turn the switch to OFF (O), disconnect
the AC cord, remove the clamp from the vehicle chassis, and then remove
the clamp from the battery terminal.
CAUTION: WHEN THE POSITIVE (+) POST OF THE VEHICLE
BATTERY IS GROUNDED, DOUBLE-CHECK POLARITY.
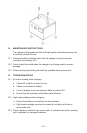
8. THE BATTERY OUTSIDE THE VEHICLE OR EQUIPMENT—NOT
CONNECTED TO THE ENGINE
If necessary to remove the battery from the vehicle or equipment, always
remove the grounded terminal from the battery rst.
WARNING: MAKE SURE ALL VEHICLE LOADS ARE OFF TO
PREVENT A POSSIBLE ARC.
FOLLOW THESE STEPS WHEN THE BATTERY IS OUTSIDE THE
VEHICLE. A SPARK NEAR BATTERY MAY CAUSE AN EXPLOSION. TO
REDUCE RISK:
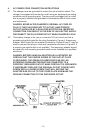
8.1 Check the polarity of the battery posts. The POSITIVE (POS., P, +) post
usually has a larger diameter than the NEGATIVE (NEG., N, –) post.
8.2 Attach an insulated battery cable that is at least a 24-inch, 6-gauge to the
NEGATIVE (NEG., N, –) battery post.
8.3 Connect the POSITIVE (RED) charger clamp to the POSITIVE (POS.,
P, +) post of the battery.
8.4 Position yourself and the free end of cable as far away from the battery as
possible. Do not face the battery when making the nal connection. Then
connect the NEGATIVE (BLACK) charger clamp to the free end of the
cable.
8.5 When disconnecting the charger, always do so in the reverse sequence of
the connecting procedure. Break the rst connection while staying as far
away from the battery as practical.
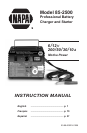
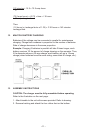
9. CHARGER FEATURES AND CONTROLS
9.1 ON/OFF SWITCH
The ON (I) /OFF (O) switch is located in the upper left-hand corner. The
OFF (O) position disconnects the AC input current to the charger, but it
does not disconnect the output of the charger from the battery.
9.2 AMMETER
Supplied on front of charger, it indicates amount of amps owing from
charger into battery. The meter’s front has zones marked CHARGE,
START, and a graphed numerical value.
• 7 •