


4 5
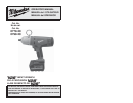
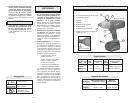
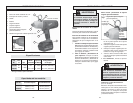
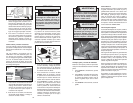
FUNCTIONAL DESCRIPTION
1. 1/2" drive shank
2. Forward/Reverse switch
3. Trigger
4. Battery pack
5. Battery pack release buttons
6. Tool hanger
7. Tool hanger ring
8. 7/16" hex quick-change chuck
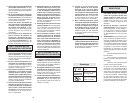
* Output rated at full speed
Impacts
Per
Minute
0 - 2450
0 - 2450
Cat.
No.
0779-20
0799-20
Average
Torque
Output*
325 ft-lbs.*
325 ft-lbs.*
Volts
DC
28
28
Specifi cations
Drive
Shank
1/2"
7/16" Hex
No Load
RPM
0 - 1450
0 - 1450
Cat. No.
0779-20
0799-20
Quick Change Auger Bits
1-1/2"
1-1/2"
Drilling Capacities
Selfeed Bits
2-9/16"
2-9/16"
4
2
3
1
5
7
6
Symbology
Volts Direct Current
Impacts per Minute Under
Load (IPM)
Underwriters Laboratories, Inc.,
United States and Canada
8
Cat. No. 0799-20
Cat. No. 0779-20
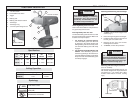
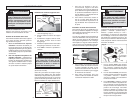
TOOL ASSEMBLY
WARNING
Always lock trigger or remove battery
pack before changing or removing
accessories. Only use accessories
specifi cally recommended for this
tool. Others may be hazardous.
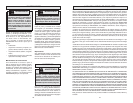
Attaching and Removing the Tool Hanger
1. To attach, remove the two top gear case
screws (Fig. 1).
2. Place the ring through the tool hanger.
3. Position the tool hanger on the tool over
the two gear case screw holes.
4. Replace the two gear case screws.
Hand tighten the screws.
5. To remove, reverse the procedure.
Gear
case
screws
Ring
Fig. 1
Tool
hanger
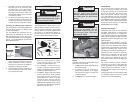
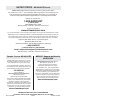
Attaching and Removing Accessories
(Cat. No. 0779-20)
This impact wrench is intended only for use
with sockets designed for impact wrenches
and that have a 1/2" square drive. Other
sockets could shatter or break, causing
injury.
Fig. 2
Drive shank
Detent pin
WARNING
Use only sockets and other
accessories specifi cally designed for
use on impact wrenches and drivers.
Other sockets and accessories might
shatter or break causing injury.
Removing Battery Pack from Tool
Push in the release buttons and pull the bat-
tery pack away from the tool.
Inserting Battery Pack into Tool
To insert the battery pack onto the tool, slide
the pack onto the body of the tool. Make sure
it latches securely into place.
1. For working in restricted spaces.
Insert the battery pack from the front
by pressing in the release buttons and
sliding battery pack into the body of the
tool. Insert the battery pack until clamp
engages.
2. For optimum weight distribution and
balance. Insert the battery pack from
the back by pressing in the release but-
tons and sliding the battery pack into the
body of the tool. Insert the battery pack
until clamp engages.