


23. Avoid accidental starting. Be sure your tool is turned off before plugging it in. Do not use
a tool if the power switch does not turn the tool on and off. Do not carry a plugged-in tool
with your finger on the switch.
24. Do not force tool. Your tool will perform better at the rate for which it was designed.
Excessive force only causes operator fatigue, increased wear and reduced control.
25. Do not abuse cord. Never carry your tool by its cord or unplug it by pulling the cord from
the outlet. Pull the plug rather than the cord to reduce the risk of damage. Keep the cord
away from heat, oil, sharp objects, cutting edges and moving parts.
26. Maintain tools carefully. Keep handles dry, clean and free from oil and grease. Follow
instructions for lubricating and changing accessories. Periodically inspect tool cords and
extension cords for damage. Refer all service to a qualified technician.
27. Store idle tools. When not in use, store your tool in a dry, secure place. Keep out of
reach of children.
28. Never operate grinder without using a guard.
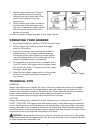
GETTING STARTED
Before operating your 4-1/2" Angle Grinder check the contents of the box to make sure you
have everything you will need.
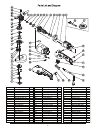
Items included in the box:
1 Operating Manual
1 4-1/2" Angle Grinder
1 Side/Top Mount Handle
1 Upper Spindle Nut
1 Lower Spindle Washer
1 Safety Guard
1 4-1/2" Grinding Disc
1 Spanner Wrench
Follow these instructions closely to insure optimum results.
ASSEMBLY
WARNING! Your grinder should never be connected to power supply when you are
assembling parts, making adjustments, installing or removing grinding wheels, or when not
in use.
1. Choose the most comfortable position for your side/top mount handle. Screw the handle
securely into one of the three handle ports located at the base of the gear housing.
2. Make sure tool is unplugged and lay it on its back with the spindle upright.
3. Remove upper spindle nut from spindle. (Turn counter clockwise. If spindle turns with
spindle nut, depress spindle lock button -located on back of gear housing- and try again.
Use of the included spanner wrench may be necessary to loosen upper spindle nut.)
4. After removing upper spindle nut, place 4-1/2" grinding disc into place. Line up flange on
lower spindle washer with center hole of grinding disc.
W
ARNING:
Use only 4-1/2" disc rated for 1
1,000 RPM or higher
.
3