


USING THE GRINDER
WARNING
The grinding wheel can fly apart and cause injury. Grinding wheels must always be checked for
cracked for cracks or imperfections. This is done with the "ring test". Tap the wheel gently near
the outer rim with the handle of a screwdriver. You should hear a clear bell-like ring. If a dull thud
occurs, do not use the wheel. The wheel may be damaged and could come apart during operation.
CAUTION: Always wear ANSI-approved safety glasses when grinding.
1. Always bring the workpiece into the wheel gently, without jarring.
2. The workpiece will quickly become heated; therefore, frequent quenching in water is required.
3. When grinding high speed steels such as drill and tool bits, avoid high temperature buildup as
this can affect the temper of the steel.
4. For small workpieces such as drill bits or chisels, avoid applying pressure to the wheel at a high
angle that could cause the workpiece to become lodged between the tool rest and the wheel.
5. When using the Flexible Shaft, be sure the Grinder is turned OFF and wait for it to stop before
setting down the Flexible Shaft.
MAINTENANCE
Dressing the Grinding Wheel
Note: New wheels frequently are not true and during operation will often become grooved, glazed
(build up), out of round, or misshapen. You will need a grinding wheel dresser for this operation.
1. Stand to the side of the wheel for this operation.
2. If the wheel is new let it run for a minute with no load. If the wheel runs straight and true you will
not need to dress it prior to operation. If it dose not, proceed with the following instructions.
3. If you are using a "pistol grip" dresser, grip the handle firmly with one hand and the arm of t
he dresser with the other. Allow the wheel to reach full speed. Use the tool rest to support your
hand and the dresser, and evenly apply the dresser to all surfaces of the wheel. The wheel can be
dressed in a few minutes.
4. If you are using an "inline" dresser, hold the handle firmly, put the dresser on the tool test so
that its wheels can move freely (i.e., the exposed part of the wheel should be facing up ). Let the
wheel reach full speed and apply the dresser evenly to all surfaces.
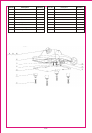
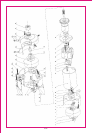
PART LIST
!
Part No.
Quantity
Description
Part No.
Quantity
Description
1
2
3
4
5
6
7
8
9
10
11
12
13
14
15
16
17
18
19
20
Left Nut M10
Wheel Pushing Ring
Polishing Wheel
Nut M4
Spring Washer M4
Flat Washer (4.3x12x1)
Steel Sleeve
Wheel Cover
Bearing Cover
Brush Cover
Bearing
Brush
Motor Housing
Flat Washer (4.3x8x0.5)
Short Sleeve
Brush Holder
Long Sleeve
Stator
Stator Bolt
Snap Ring
30
31
32
33
34
35
36
37
38
39
40
41
42
43
44
45
46
47
48
49
Plastic Shield
Lock Nut M4
Plastic Shield Mounting Plate
Flat Washer
Spring Washer
Pan Head Screw M6x20
Pan Head Screw M4x40
Cover
Grinding Wheel
Gasket
Nut M10
Flexible Shaft Connector
Rotating Guard
Wheel Cover
Pan Head Screw M5x10
Flexible Shaft Connector Nut
Knob
Nut M10
Washer
Switch
2
2
2
2
2
2
2
1
1
2
1
1
1
1
1
1
1
1
1
1
1
4
1
6
13
4
2
1
1
2
1
2
1
9
2
1
2
1
2
2
3 of 5