


10 GB/IE
operating the device and to anyone near the
work area.
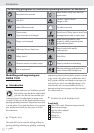
Wear a dust mask!
½
WARNING!
NOXIOUS FUMES!
Ensure that there is adequate ventilation when
machining surfaces containing plastic or cov-
ered with paint, varnish etc.
½ Do not soak the materials or the sur-
face you are about to work on with
liquids containing solvents.
½ Avoid abrading paints containing
lead or other substances hazardous
to health.
½ Do not machine materials containing
asbestos. Asbestos is a known carcinogen.
½ Do not machine moist materials or
damp surfaces.
NOTE! Do not allow the tool to come to a
standstill by overloading it!
½
WARNING!
Switch the device off
and allow it to come to a standstill be-
fore you put it down.
½
WARNING!
Always keep the de
vice
clean, dry and free of oil or grease.
½ Children or persons who lack the knowledge or
experience to use the device or whose physical,
sensory or intellectual capacities are limited
must never be allowed to use the device without
supervision or instruction by a person responsible
for their safety. Children must never be allowed
to play with the device.
©
Operation
½ Never use the device for a purpose
for which it was not intended or with
non-original parts / accessories. The use
of tools or accessories other than those recom-
mended in the operating instructions could lead
to you suffering an injury.
©
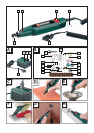
Inserting or replacing
a tool / collet
˽ Press the spindle lock
6
and keep it pressed.
˽ Rotate the clamping nut
4
until the lock
engages.
˽ Loosen the clamping nut
4
with the combina-
tion key
23
.
˽ If a tool is already inserted, remove it.
˽ First insert the tool you wish to use though the
clamping nut
4
before you insert it into the
collet
18
suitable for the tool shaft.
˽ Press the spindle lock
6
and keep it pressed.
˽ Insert the collet
18
into the threaded insert and
tighten the clamping nut
4
on the thread using
the combination key
23
.
Using the Insertion tool with mandrel
12
:
NOTE: Use the screwdriver end of the combi-
nation key
23
to release or tighten the screw of
the mandrels
12
.
˽ Insert the mandrel
12
into the electrical tool as
described.
˽ With the aid of the combination wrench
23
,
unscrew the screw from the mandrel
12
.
˽ Place the insertion tool you wish to have onto
the screw between the two washers.
˽ With the aid of the combination wrench
23
,
tighten the screw on the mandrel
12
.
©
Switching on and off /
Setting the speed range
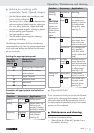
Switching on / Setting the speed range:
˽ Connect the plug
3
to the power supply unit
9
by inserting it into the plug-in device
7
provided
for such purposes (see Fig. C).
˽ Connect the device to the power supply by
inserting the mains plug into the socket.
˽ Set the ON / OFF switch
1
to a position
between “5” and “20”.
Switching off:
˽ Set the ON / OFF switch
1
to position “0”.
General safety advice for electrical power tools / Operation