


4 Pelco Manual C1470M (9/97)
3.0 INSTALLATION
Before mounting the HS2400, make certain that the mounting surface is capable of
supporting four (4) times the weight of the enclosure plus camera and lens.
Determine the location of the enclosure and means of delivering all necessary ca-
bling before beginning the installation process. Knockouts that will accommodate
1/2-inch (1.27 cm) conduit have been provided on both wall mounting surfaces and
the ceiling surface.
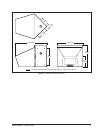
3.1 FLUSH CEILING OR MID-WALL CORNER MOUNT
To install the HS2400:
1. Remove the two (2) tamper-resistant screws on the underside of the housing
(using the hex key that is provided) and separate the cover from the mounting
bracket. Remove the tilt table assembly.
2. Using the mounting bracket as a template, mark on the mounting surface
eight holes for mounting the enclosure and, as required, holes for cabling. Drill
the holes.
3. Attach the enclosure with eight 1/4-20 fasteners (not supplied).
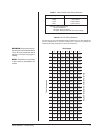
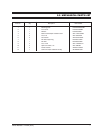
4. Route cabling to the enclosure. Refer to Table A for the type of video coaxial
cable to use. If your camera will use 24 VAC power, refer to Table B to deter-
mine the size of wire to use. If you are using conduit, attach it to the enclosure.
5. Mount the camera and lens to the tilt table assembly with the 1/4" bolt, flat
washer and split locker washer that are provided. Install the completed as-
sembly onto the mounting bracket.
6. Make all camera and lens connections and adjust the tilt table assembly and
camera lens as necessary.
7. Replace the cover. Check that all components clear the cover and that cam-
era angle and lens adjustments are satisfactory. When all adjustments are
complete, secure the cover with the hex key that is provided.