


LUBRICATION
Before EACH SESSION, we recommend you check the tables
for slop (easy to x—see step 19 on page 14) and lubricate
the ways with aTeon based dry-lm lubrication. You want your
tables to slide as smoothly as possible. For example, at trade
shows, we lubricate the ways three or four times over an eight
hour period.
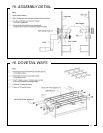
Please review the lubrication guide on page 19 for all other lu-
brication locations (this is done once or twice a year depending
on use.)
ASSEMBLY
Step-by-step assembly instructions are included in this Users
Guide. Please contact us if you have any difculties assembling
the Jointmaker Pro. We also have posted on our website videos
showing how we align the blade to the ways and proper table
adjustments. They are not difcult to do but the videos may in-
crease your understanding of these two important adjustments.
Your Jointmaker Pro is fully warranted for defects in workman-
ship. Please notify us immediately if you have encountered ad-
efective component. We will replace it immediately.
CALIBRATION
LINEAR TABLE ADJUSTMENTS The Jointmaker Pro was
designed to perform as quietly as possible. The two dovetailed
aluminum rails on each side of the blade are xed in place by
the front and back plates—they are not adjustable. Underneath
each sliding table are two acetyl dovetailed sliders. The slider
closest to the saw blade on each table is xed (non-adjustable).
The acetyl slider furthest from the saw blade on each table is
adjustable and when properly tensioned, both tables will slide
smoothly without any lateral slop. You will periodically adjust the
tension on these two ways over time for optimal performance
—this process usually takes two or three minutes and is fully
demonstrated in the assembly video.
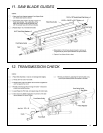
SAW GUIDES The saw blade of the Jointmaker Pro moves
up and down between two blade guides that literally pinch the
blade. One guide is black, the other is blue. Once assembled,
the blue guide is the only guide that is adjusted when chang-
ing between blades of different thicknesses. The black guide is
never adjusted.
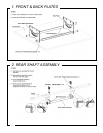
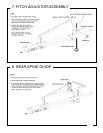
FRONT AND BACK PLATE TRAVELERS The saw blade and
the components that raise and lower the blade are attached to
an aluminum keel. The keel is attached to acetal travelers that
allow the blade to tilt up to 45 degrees in either direction by rid-
ing in arcs milled into the front and back plates.
The two acetyl travelers must glide in the front and back plates
without any slop. There are two nylon set screws in each trav-
eler that allow for this adjustment. If these nylon set screws are
not properly adjusted, the keel will not remain parallel to the
ways.
YOUR FIRST CUT
Once your Jointmaker Pro is properly set-up, you are ready to
make your rst cut.
We recommend practicing your rst cut on a small dowel rod,
1/4” – 1/2” in diameter. Set the leading edge of the crosscut
blade slightly below table height, and using the pitch adjus-
tor, raise the rear of the blade until it is slightly taller than your
stock.
Before you make a cut, take a couple of “dry runs” to get a feel
for the resistance of the tables in motion. When comfortable,
hold your material rmly against the fence and with one smooth,
controlled push, cut your stock. You will discover after just a
few passes the rhythm required for incredible results. As the
density/width of your stock changes, you will sense the need to
reduce depth of cut and increase the number of passes. THERE
ARE NO GUIDELINES other than to offer that the feedback you
sense from the cutting action will dictate any adjustments you
will need to make for effortless cutting.
We invite you to visit our website (www.bridgecitytools.com) to
view videos of how we cut different materials.
YOUR EXPERIENCES WITH THE JOINTMAKER PRO MAT-
TER!
Please share your experiences and ideas regarding the Joint-
maker Pro with fellow users! This new and exciting tool is capa-
ble of extraordinary applications, some that may be understood
only by dedicated users. Please share and/or inquire by partici-
pating in the user forums located at www.bridgecitytools.com.
Thank you again for your purchase of the jointmaker pro. please
share pictures and stories with us as you employ this remark-
able new tool in your shop!!
John Economaki
President
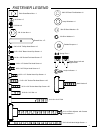
TOOLS REQUIRED FOR ASSEMBLY
A at table surface is the best place to assemble the
Jointmaker Pro.
#2 Philips Head Screwdriver
Small Hammer
9/16” Open ended wrench or Adjustable Wrench
Needle Nose Pliers
3