


10
USING THE SANDER
1. CAUTION: Secure work to prevent if from moving during the sanding
operation. Friction between the sanding disc and work will try to spin work
away from sander and may cause bodily injury.
2. CAUTION: WEAR SAFETY GLASSES AND DUST MASK.
3. Place sander pad in light contact with the work before switching the
motor “ON”.
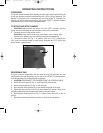
4. Grasp sander firmly and move switch to “ON” position.
5. Move sander in long overlapping strokes. Tipping sander or stopping in
one spot can produce an uneven finish.
6. When finished, keep pad in contact with work, move switch to “OFF”
position and lift sander from the work. Allow pad rotation to stop completely
before setting sander down.
MAINTENANCE
KEEP TOOL CLEAN
Periodically blow out all air passages with dry, compressed air. Remove
buildup of grime resulting from working with green or sappy wood. All plastic
parts should be cleaned with a soft damp cloth. NEVER use solvents to clean
plastic parts.
CAUTION: Wear safety glasses while using compressed air.
FAILURE TO START
Should your tool fail to start, check to make sure the prongs on the cord plug
are making good contact in the outlet. Also, check for blown fuses or open
circuit breakers in the line.
BRUSH INSPECTION AND LUBRICATION
At approximately 200 hours of use, take or send your tool to your nearest
Authorized Porter-Cable Service Station to be thoroughly cleaned and
inspected; worn parts replaced, when necessary; relubricated with fresh
lubricant, if required; reassembled with new brushes; and performance
tested.
Any loss of power before the above maintenance check may indicate the
need for immediate servicing of your tool. DO NOT CONTINUE TO OPERATE
TOOL UNDER THIS CONDITION. If proper operating voltage is present,
return your tool to the Service Station for immediate service.
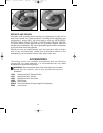
BELT REPLACEMENT
1. CAUTION: DISCONNECT SANDER FROM POWER SOURCE.
2. Remove back-up pad (see REVERSIBLE PAD).
3. Remove the old belt and clean the belt mounting area.
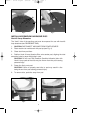
4. Position the new belt around pulley (A) Fig. 11, and start it onto the
shoulder of the pad support (B).
5. Rotate the pad support as you “walk” the belt onto it (see Fig. 12).
6. Reassemble back-up pad (see CHANGING BACK-UP PAD).
900007 - 02-28-01.QXD 9/26/02 11:46 AM Page 10