


7
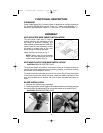
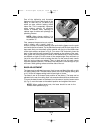
3. Open the blade clamp by rotating the
movable lever (B), Fig. 2, towards the
stationary lever (A), Fig. 2, as far as it will go
and hold.
4. While holding the blade clamp open;
move lever (A) as far forward as it will go,
(see Figs. 2 & 3), and hold.
NOTE: Steps 3 and 4 should be done in
one motion.
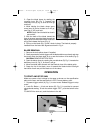
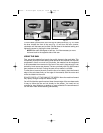
5. With the teeth of the blade toward the
front of the saw, insert the blade through the
blade guide into the blade holder as far as it
will go and release the levers (Fig. 4).
6. Pull up on the blade (Fig. 3) until it locks in place. The blade is properly
installed when the levers are aligned as shown in Fig. 4.
BLADE REMOVAL
1. Remove the anti-splinter insert if installed.
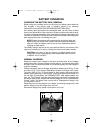
2. Gently squeeze the switch trigger until the blade shaft moves slowly and stop
the motor when the blade shaft is at or near the bottom of its stroke (Fig. 6).
CAUTION: REMOVE BATTERY PACK.
3. Open the blade clamp by rotating the movable lever (B), Fig. 2, towards the
stationary lever (A), Fig. 2, as far as it will go.
4. Move the blade shaft forward until the blade is clear of the blade guide.
5. Grasp the tip of the blade, move it towards the blade holder lever/right
hand side of saw and pull the blade out of the clamp.
OPERATION
TO START AND STOP SAW
Make sure power circuit voltage is the same as shown on the specification
plate on the saw, and that saw switch is OFF. Connect battery pack.
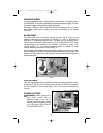
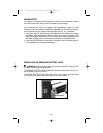
1. Squeeze trigger switch (A), Fig. 5, to start motor. Release trigger to stop
motor.
2. Lock-Out Button – A lock-out button (B), Fig. 5, is provided to prevent
unintentional starting. To lock the switch trigger “OFF”, push the button to the
right.
To UNLOCK the lock-out, push the button to the left.
Fig. 4
Fig. 5
A
B
908937 - 12-20-02.qxd 12/20/02 10:02 AM Page 7