


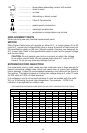

9
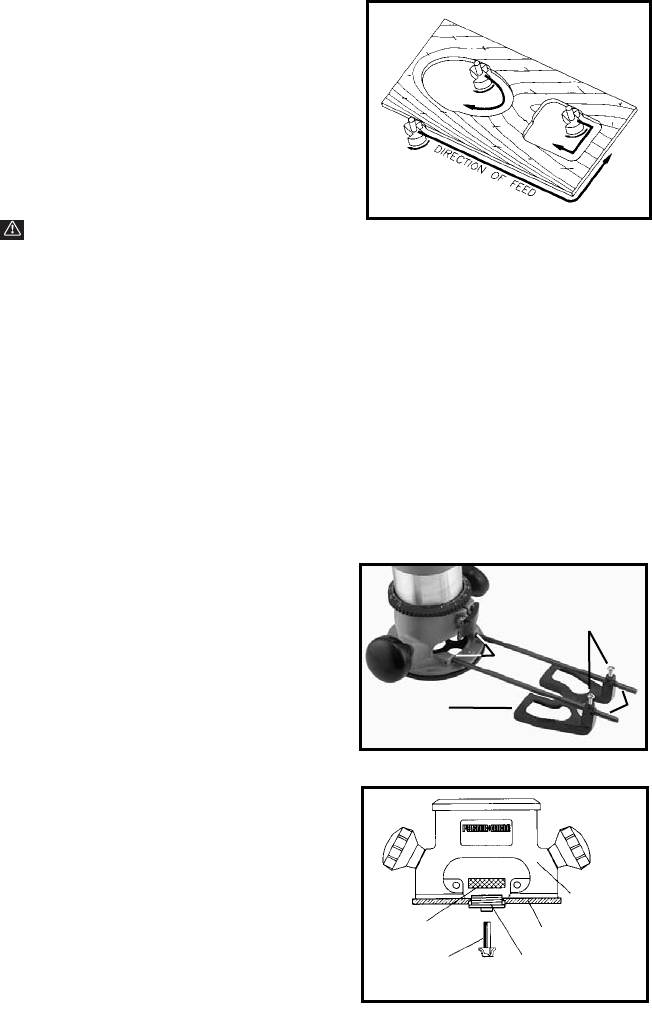
Since the cutter rotates clockwise
(when viewing router from top), move
the router from left to right to obtain a
more efficient cutting. (Fig. 6).
When working on the inside of a
templet, move the router in clockwise
direction. When working on the outside
of a templet, move the router in a
counter-clockwise direction.
WARNING: Avoid “Climb-Cutting”
(cutting in direction opposite that shown
in Fig. 6). “Climb-Cutting” increases the chance for loss of control resulting in
possible personal injury. When “Climb-Cutting” is required (backing around a
corner), exercise extreme caution to maintain control of the router.
The speed and depth of cut will depend largely on the type of work material.
Keep the cutting pressure constant, but do not use so much pressure that the
motor speed slows excessively. More than one pass at various settings may
be necessary.
When making cuts on all four edges of the workpiece, start the first cut on the
end of the piece across the grain to minimize chipping of the wood at the end
of a cut.
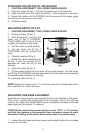
THE EDGE GUIDE
An edge guide is available as an
accessory to aid in straight edge planing,
parallel grooving, dado, or slotting
operations.
To attach, insert the guide rods (A) Fig. 7
in holes in the base, and secure it with
screws (B). Adjust the guide (C) on the
rods and secure it in position with the
thumb screws (D).
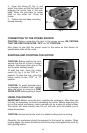
TEMPLET GUIDES
A wide variety of templet guides is
available for use in pattern and templet
routing operations. Fig. 8 shows a typical
combination bit, templet guide, and
locknut.
CAUTION: DISCONNECT TOOL FROM
POWER SOURCE.
To install, insert the templet guide in the
center hole in the router base and secure
it in place with a locknut.
BEFORE CONNECTING THE ROUTER TO THE POWER SOURCE, Install
the bit. Adjust the depth of cut and rotate the router chuck by hand, checking
to see that the bit or collet do not contact templet guide.
Fig. 6
Fig. 7
A
B
C
D
Fig. 8
LOCKNUT
ROUTER BIT
ROUTER
BASE
SUB-BASE
TEMPLET GUIDE