


10
2. Wear ANSI Z87.1 safety glasses and dust mask.
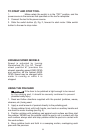
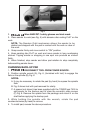
3. Place sander to work (see Fig. 5) with abrasive disc resting FLAT on the
work.
NOTE: The Random Orbit mechanism allows the sander to be
started and stopped with the pad in contact with the work or clear of
the work.
4. Grasp sander firmly and move switch to “ON” position.
5. Keep sanding disc FLAT on work and move sander in long overlapping
strokes. Tipping sander or stopping in one spot can produce an uneven
finish.
6. When finished, stop sander and allow pad rotation to stop completely
before setting sander down.
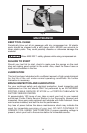
CHANGING BACK-UP PAD
1. DISCONNECT TOOL FROM POWER SOURCE.
2. Position spindle wrench (A), Fig. 6, (furnished with tool) to engage the
flats on the spindle (B), Fig. 6.
NOTES:
A. It may be necessary to rotate the pad (by hand) to expose the spindle
flats.
B. Fig. 6 shows tool with pad removed for clarity.
C. A spacer (not shown) has been supplied with the 7336SP and 7424 to
add space for the backup pad to clear the eccentric plate screws
(C) Fig. 6. Remove the spacer from the package and mount it on the
shaft before applying the backup pad.
3. While holding the spindle with the wrench, rotate the pad
counterclockwise (by hand) to remove.
4. To install pad, reverse the above procedure.
Fig. 5