


17- ENG
A08188
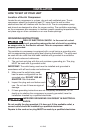
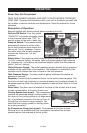
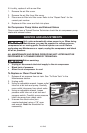
6. Using a screwdriver, carefully push
the valve disc up and down. NOTE:
The valve disc should move freely
up and down on a spring which
holds the valve disc in the closed
position; if not the check valve
needs to be cleaned or replaced.
7. Clean or replace the check valve.
A solvent, such as paint or varnish
remover can be used to clean the
check valve.
8. Apply sealant to the check valve threads. Reinstall the check valve (turn
clockwise).
9. Replace the pressure release tube. Tighten nuts.
10. Replace the outlet tube and tighten nuts.
11. Perform the Break-in Procedure. See "Break-in Procedure" in the
Operation section.
In closed position
disc is visible.
In open
position
nothing is
visible.
Screwdriver
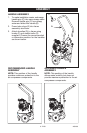
To Replace Regulator
1. Release all air pressure from air tank. See "To Drain Tank" in the
Maintenance section.
2. Unplug compressor.
3. Remove the outlet pressure gauge and quick connect (if equipped) from
the regulator.
4. Remove the regulator.
5. Apply pipe sealant tape to the nipple.
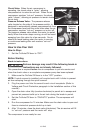
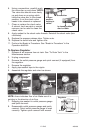
6. Assemble the regulator and orient as shown.
NOTE:
Arrow indicates flow of air. Make sure it is
pointing in the direction of air flow.
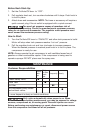
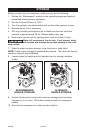
7. Reapply pipe sealant to outlet pressure gauge
and quick connect.
8. Reassemble outlet pressure gauge and quick
connect. Orient outlet pressure gauge to read
correctly. Tighten quick connect with wrench.
Nipple
Outlet
Pressure
Gauge
Quick
Connect
Regulator
Regulator
Regulator
Arrow