


10
OPERATION
NOTE: This tool is shipped completely assembled. No assembly time or
tools are required.
ASSEMBLY
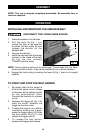
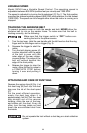
1. Place the sander on its left side.
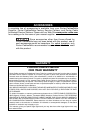
2. Pull the lever (A) Fig. 1 out
toward the front of the machine
to retract the idler pulley (B) and
release the tension on the
abrasive belt.
3. Remove the old belt.
4. Install the new belt with the arrow
(printed on the inside of the belt)
on the top and pointing
TOWARD the idler pulley.
DISCONNECT TOOL FROM POWER SOURCE.
INSTALLING AND REMOVING THE ABRASIVE BELT
A
B
Fig. 1
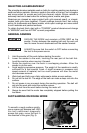
TO START AND STOP THE BELT SANDER
1. Be certain that the the switch is
off and the power circuit voltage
is the same as the voltage shown
on the specification plate.
Connect the machine to a power
circuit.
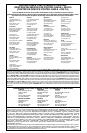
2. Squeeze the trigger (A) Fig. 2 to
start the motor. Release the
trigger to stop the motor.
3. To allow the motor to run without
constantly holding the trigger,
press the trigger switch (A), push
the lock button (B) Fig. 2, and
release the trigger switch.
4. To release the lock button,
squeeze the trigger and release.
B
A
C
NOTE: Some sanding belts are bi-directional. These belts will not have
arrows printed on them. They can be installed to run in either direction.
5. Engage the front pulley by pushing the lever (A) Fig. 1 back to its original
position.
Fig. 2