


15
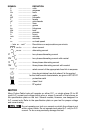
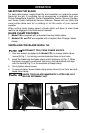
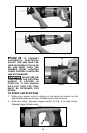
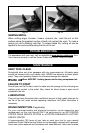
2. The Models 746 and 747 are supplied with a keyless Quik-Change
™
pivoting guide shoe. To adjust, rotate lever (A) Fig. 12B. releasing the
pivoting guide shoe (B). Adjust to desired position and close lever (A) Fig.
12C. The keyless Quik-Change
™
pivoting guide shoe is designed with a
raised lip (C) at the end that prevents the guide shoe from locking in position
if it is extended out too far. After adjusting, make sure the locking lever is
completely closed in the locked position (A) Fig. 12C.
NOTE: DO NOT force the locking lever closed. Adjust shoe enough to allow
the lever to lock in position without force.
BEFORE YOU START TO WORK
Select the blade best suited for the material to be cut. For greatest
economy, use the shortest blade suitable for the thickness of the material to
be cut.
Be sure the material to be cut is rigid. Small work pieces should be securely
clamped in a bench vise or with clamps to the work table. As the work
progresses in scroll or curved cut-out pieces, the material may be
readjusted to accommodate the movement of the saw. The saw cuts freely
with only slight feed pressure. Forcing the saw will not make it cut faster.
SAWING WOOD
The TIGER SAW
®
is used much the same as a hand saw in that it is moved
toward the operator during the cutting operation. However, since the blade
cuts on the up-stroke instead of the down-stroke as in the case of the hand
saw, the good or finish side of the work should face down during the cutting
operation.
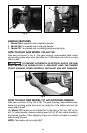
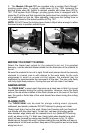
PLUNGE CUTS
The TIGER SAW
®
can be used for plunge cutting wood, plywood,
wallboard, and plastic materials. DO NOT attempt to plunge cut metal.
Clearly mark line of cut on the work. Grasp front housing with one hand and
rear handle with the other hand. To start cut, rest saw on pivoting guide
shoe bracket, align blade with the marked line of cut, (blade NOT touching
work), as shown in Fig. 13. Start saw. Using guide shoe bracket as a pivot
point, roll saw forward by raising rear handle, as shown in Fig. 14. When
blade has cut through the work, continue raising the rear handle until saw is
perpendicular to the work surface. Keep saw in this position and move blade
along line of cut.
Fig. 12B
B
A
A
Fig. 12C
C