


U5047A PAG QUASAR INSTRUCTION MANUAL
U5047A PAG QUASAR INSTRUCTION MANUAL
OPERATING INSTRUCTIONS
SECTION 4
4.1 POWERING UP
Connect the charger to a suitable supply using the standard lead
supplied. The LCD screen will illuminate and briefly display the PAG
logo and charger model before entering normal operating mode. With
no batteries connected, all channels will indicate absent. Quasar
chargers may be disconnected from the supply at any time in complete
safety and without damage to the charger or any batteries connected.
IMPORTANT: Note section 4.10, Supply Failure. The charger remembers
the status of batteries when the mains supply is disconnected. If the
charger has been previously disconnected from the supply with
charged batteries connected, it is important to connect the charger
to the supply BEFORE connecting another set of batteries.
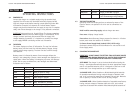
4.2 THE SCREEN
The screen displays two lines of information. The top line indicates
battery status, and the lower line indicates battery voltage, charge
loaded, and discharge capacity. The lower line also confirms charge
rate selection.
Battery status is indicated by means of text messages. Where the
battery is not undergoing a process, these messages are displayed in a
steady state. Where the battery is undergoing a process, the message
blinks. Due to space considerations, text messages are abbreviated.
Indications are as follows:
4.3 THE FUNCTION BUTTON
Operating modes and display options are selected by means of the
Function button, the operation of which can be summarised as
follows:
Hold in while connecting supply: selects charge rate menu.
Press once: displays charge loaded.
Press twice: selects Recovery Charge program for channel 1. A further
button press moves the selection to channel 2.
In Camera Power Supply Mode (models 9752 & 9753 only):
disconnect camera and press Function Button for one second to exit
Power Supply mode.
4.4 CHANGING THE CHARGE RATE
IMPORTANT: DO NOT CHANGE THE SETTING FROM AUTO MODE UNLESS
THERE IS A GOOD REASON FOR DOING SO, AND THE IMPLICATIONS OF
CHARGING AT THE ALTERNATIVE RATE ARE FULLY UNDERSTOOD.
AUTO MODE: The charger is set to the Auto Mode before leaving the
factory. Auto Mode automatically selects the most appropriate charge
rate for all specified batteries, and it is designed so that even at the
lowest rate it can charge batteries up to 10Ah capacity.
2A CHARGE RATE: Nickel-Cadmium or Nickel-Metal Hydride batteries
of reputable manufacture having nominal voltages of between 4.8V
and 14.4V, and nominal capacities of between 1Ah and 5Ah. Batteries
with a capacity in excess of 5Ah will not be fully charged.
3A CHARGE RATE: Nickel-Cadmium batteries of reputable manufacture,
having nominal voltages of between 4.8V and 14.4V, and nominal
capacities of between 2Ah and 8Ah. Nickel-Metal Hydride batteries of
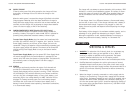
Indication: Appearance: Status:
ABST Continuous No battery connected
WAIT Continuous Waiting in queue for charge
CHRG Blinking Charging in progress
BLNC Blinking Balance charge in progress
DONE Continuous Program completed
FAIL Continuous Battery unsuitable for processing
RCVY Blinking Recovery charge in progress
WAIT/°C Alternate Waiting - battery too hot or cold
CHRG/NiMH Alternate Charging of PAG NMH in progress
CHRG/Liion Alternate Charging of PAG Li-Ion in progress (or other
Li-Ion via PAGIntelligent Charge Adaptor).
7
8