


3
• Never touch the bulb with your bare hands. Oil from your skin can cause
premature failure. Always handle the bulb with gloves or a soft cloth.
• If lens is replaced, use only a diffused tempered safety glass of equal
thickness.
• For maximum bulb life, position light so that the quartz halogen bulb
remains within 4° of horizontal.
• Disassembly of your fixture will void the warranty.
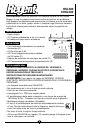
Installing the bulbs
Step 1: Loosen the screw and retaining clip that secures the wire guard and
lens assembly.
Step 2: Rotate the retaining clip so that the wire guard and lens assembly
will swing down.
Step 3: Remove bulb and CAUTION sheet from inside wire guard and lens
assembly. Unpack bulb, being careful not to touch with your bare
hands (see caution sheet packed with bulb).
Step 4: Using gloves or a soft cloth, gently press the bulb to one side of the
socket and insert the opposite end into the other side of the socket.
Reverse this procedure to remove the bulb.
Step 5: Close wire guard and lens assembly. Rotate retaining clip to secure
and retighten retaining clip screw.
Step 6: Repeat Steps 1 through 5 for the other bulb.
NOTE: Should the light not turn on when power is applied and the switch is
turned on, unplug the fixture, then check to be sure both bulbs are seated
properly in the socket receptacles.
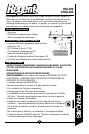
Hanging your fixture
Step 1: After selecting the installation location site on your ceiling, determine
if you can install “J” screw hooks (included) directly into ceiling joists
or studs in your ceiling. If not, you will need to use two drywall tog-
gle bolts (not included). NOTE: The “J” screw hooks should be posi-
tioned 32” apart so that the fixture chains are hanging straight from
the ceiling to the fixture.
Step 2: Install “J” screw hooks into the ceiling joists or drywall toggle bolts,
making sure they are tight and secure.
Step 3: Hang both chains (already attached to the fixture) over the “J” screw
hooks installed in Step 2. NOTE: This fixture must be hung at least
12” from the ceiling and the wall for proper ventilation.
How to use
Step 1: Plug the power cord into a 120 Volt receptacle.
Step 2: Pull the switch chain located in the center of the fixture to turn the
fixture on. Pull the switch chain again to turn the fixture off. NOTE:
If the switch chain is too short to reach, an extension has been
included which can easily snap onto the bottom of the switch chain.
WARNING: The halogen bulbs and fixture housing get hot during use. Do
not touch the bulbs or fixture housing until they have had time to cool.