


932VS Portable Band Saw
Ridge Tool Company 5
as it will go and push in the lock button and release
trigger.
To UNLOCK the lock, squeeze trigger allowing lock
button free to spring out and release trigger.
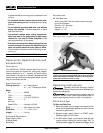
4. The 932VS is equipped with an adjustable variable
speed control. The speed is adjusted by turning the
control knob. (Figure 1)
Selecting the Blade
Band Saw Blades
Model 932VS Band Saw requires blades that are .020
thick;
1
/
2
″ wide; and 44
7
/
8
″ long.
NOTE! DO NOT USE blades for stationary band saws.
Blades for stationary band saws are of different thickness
than above and WILL NOT fit the precision blade guides
on portable band saws.
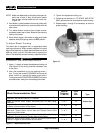
REFER TO THE BLADE SELECTION CHART (Figure
11) for types of blades available and their recommended
usages. This chart is provided as a guide only. Due to
the many materials that can be cut, operator’s experi-
ence will determine which blade will have the longest life
for any specific operation.
Which Blade to Use
In general, select a blade which will allow at least two
teeth to be engaged in the material thickness. The thin-
ner or the harder the material, the finer the blade teeth
should be. For thicker or softer material, a blade with
coarser blade teeth is recommended. The hi-speed
steel blades stay sharp longer than alloy steel blades.
Blade Care
Blade life will be extended by using a wax-type cutting lu-
bricant as supplied with saw. Keep sharp blade in saw.
Under no condition should a liquid coolant
be used with this saw. The bearings and rubber tires on
pulleys may be damaged as a result.
NOTE! Stick wax is especially helpful when cutting large
sections of aluminum and soft brass because it
will help keep gullets clean. On hard materials,
stick wax will help keep blade cool so hardness
will not be drawn from teeth. The use of this lu-
bricant promotes a cleaner, smoother surface
on sides of cut.
Cutting Procedures
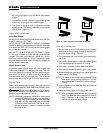
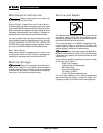
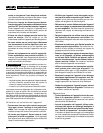
1. Be sure work to be cut is held securely and is properly
positioned so that greatest number of teeth will con-
tact work when cutting. (Figure 2)
2. Plug saw power cord into properly grounded electri-
cal outlet.
3. Set variable speed switch in desired position. Speed
CAN be changed while machine is running.
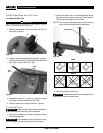
4. Hold saw in a natural position away from work.
5. Start saw by depressing switch trigger in rear handle.
6. Keeping blade rear guide stop firmly against work and
lower saw to cut material.
NOTE! Let weight of saw furnish cutting pressure. Do not
bear down during cutting operations. This will
slow down speed of blade and reduce cutting ef-
ficiency.
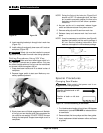
7. Upon completion of cut, hold Saw firmly so it does not
fall against work.
8. Release switch trigger and unplug power cord.
NOTE! After prolonged cutting, wax will cling to pulleys of
Saw. This does not affect operation of Saw. All
that is necessary is to unplug Saw from power
source and wipe wax from pulleys.
Figure 2 – Work Properly Positioned For Saving
CAUTION
Right
Right
Wrong
Wrong