


12
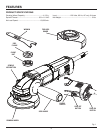
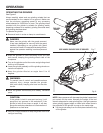
TURNING THE GRINDER ON/OFF
See Figure 4.
To turn the grinder ON:
Push the lock-off button down and depress the paddle
switch.
To turn the grinder OFF:
Release the paddle switch.
LOCK-ON BUTTON
See Figure 4.
This grinder is equipped with a lock-on feature, which is
convenient for continuous grinding for extended periods of
time. To lock-on:
Hold the grinder in front and away from you, keeping the
grinding wheel clear of the workpiece.
Push the lock-off button down and depress the paddle
switch.
Push in and hold the lock-on button, located on the back
of the handle.
Release the paddle switch.
Release the lock-on button and the grinder will continue
running.
To release the lock, depress and release the paddle
switch.
If the lock-on feature is engaged during use and the grinder
becomes disconnected from the power supply, disengage
the lock-on feature immediately.
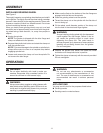
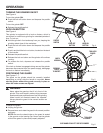
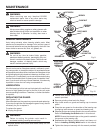
POSITIONING THE GUARD
See Figures 5 - 7.
The guard on the grinder should be correctly installed
depending on which side the handle is mounted. Never
use the grinder without the guard correctly in place or
when the index arrows are aligned.
WARNING:
Never place the guard so that it is in front of the
grinder. This could result in serious injury because
sparks and loose particles thrown from the grinding
wheel would be directed toward the operator.
Always place the guard in the correct location as
shown.
To adjust the guard:
� Unplug the grinder.
� Depress lever and rotate the guard to its correct position
as shown.
NOTE: Be sure the raised ridge on the guard is seated
in the groove on the bearing cap. Never use the grinder
without the guard in place and properly adjusted.
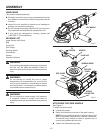
OPERATION
Fig. 4
Fig. 5
SIDE HANDLE ON LEFT SIDE OF GRINDER
PADDLE
SWITCH
LOCK-ON
BUTTON
LOCK-OFF
BUTTON
DEPRESS
LEVER
TO ROTATE
TOOLLESS
GUARD
Fig. 6
TOOLLESS
GUARD
INDEX
ARROWS