


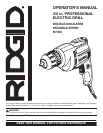


9
UNPACKING
INSTRUCTIONS
Your drill has been shipped completely assembled.
n Carefully remove the tool from the box.
n Make sure that all items listed in the packing list are
included.
n Inspect the tool carefully to make sure no breakage or
damage occurred during shipping.
n Do not discard the packing material until you have care-
fully inspected and satisfactorily operated the tool.
n If any parts are damaged or missing, please call
1-866-539-1710 for assistance.
PACKING LIST
Drill
Case
Operator’s Manual
WARNING:
If any parts are missing do not operate this tool
until the missing parts are replaced. Failure to do so
could result in possible serious personal injury.
WARNING:
This tool should never be connected to a power
supply when you are assembling parts, making
adjustments, cleaning, performing maintenance,
or when the tool is not in use. Disconnecting the
tool will prevent accidental starting that could
cause serious injury.
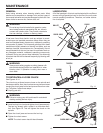
OPERATION
WARNING:
Do not allow familiarity with tools to make you
careless. Remember that a careless fraction of a
second is sufficient to inflict severe injury.
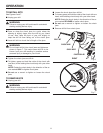
APPLICATIONS
(Use only for the purpose listed below)
n Drilling in wood.
n Drilling in ceramics, plastics, fiberglass, and laminates.
n Drilling in both hard and soft metals.
n Using driving accessories, such as driving screws with
screwdriver bits.
n Mixing paints.
WARNING:
Always wear safety goggles or safety glasses with
side shields when operating this tool. Failure to do
so could result in dust, shavings, or loose particles
being thrown into your eyes, resulting in possible
serious injury.
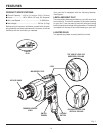
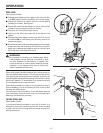
SWITCH TRIGGER
See Figure 2.
To turn your drill ON, depress the switch trigger. Release
switch trigger to turn your drill OFF.
Fig. 2
SWITCH TRIGGER
LOCK-ON
BUTTON
®
LOCK-ON BUTTON
See Figure 2.
Your drill is equipped with a lock-on feature, which is conve-
nient when continuous drilling for extended periods of time is
required. To lock-on, depress the switch trigger, push in and
hold the lock-on button located on the side of the handle,
then release switch trigger. Release lock-on button and your
drill will continue running.
To release the lock, depress the switch trigger and release.
If you have the lock-on feature engaged during use and your
drill becomes disconnected from power supply, disengage
the lock-on feature immediately.