9
WARNING:
If any parts are damaged or missing do not operate
this tool until the parts are replaced. Failure to
heed this warning could result in serious personal
injury.
WARNING:
Do not attempt to modify this tool or create
accessories not recommended for use with this
tool. Any such alteration or modification is misuse
and could result in a hazardous condition leading
to possible serious personal injury.
WARNING:
To prevent accidental starting that could cause
serious personal injury, always remove the battery
pack from the tool when assembling parts.
FEATURES
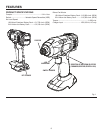
KNOW YOUR IMPACT DRIVER
See Figure 1.
The safe use of this product requires an understanding of
the information on the tool and in this operator’s manual as
well as a knowledge of the project you are attempting. Before
use of this product, familiarize yourself with all operating
features and safety rules.
BIT STORAGE
Bits provided with the impact driver can be placed in the
storage area, located on the base of the tool.
BLOWS PER MINUTE
This tool features an impact speed of up to 3,300 BPM
(Blows Per Minute). Blows Per Minute is the number of
impacts per minute.
COMPACT DESIGN
The compact design of the impact driver allows the operator
to get into tight areas.
COUPLER
Quickly and easily change bits without the need for tools.
UNPACKING
This product has been shipped completely assembled.
Carefully remove the tool and any accessories from the
box. Make sure that all items listed in the packing list are
included.
Inspect the tool carefully to make sure no breakage or
damage occurred during shipping.
Do not discard the packing material until you have
carefully inspected and satisfactorily operated the tool.
If any parts are damaged or missing, please call
1-866-539-1710 for assistance.
PACKING LIST
Impact Driver
Bit
Operator’s Manual
ASSEMBLY
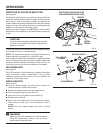
DIRECTION OF ROTATION SELECTOR
(FORWARD/REVERSE/CENTER LOCK)
The impact driver has a direction of rotation (forward/reverse/
center lock) selector located above the switch trigger for
changing the direction of bit rotation. Setting the switch
trigger in the OFF (center lock) position helps reduce the
possibility of accidental starting when not in use.
ELECTRIC BRAKE
The electric brake will stop the bit rotation after the operator
releases the switch trigger.
LED WORKLIGHT
The LED worklight, located below the coupler, illuminates
when the switch trigger is depressed. This provides extra
light for increased visibility.
MINIMUM REACTIVE TORQUE
This impact driver minimizes the amount of reactive torque
to the operator.
VARIABLE SPEED
The variable speed switch trigger delivers higher speed with
increased trigger pressure and lower speed with decreased
trigger pressure.


