• 15 Amp grounded electrical outlet.
• Clear path to the electrical outlet that does not
contain any sources of heat or oil, sharp edges or
moving parts that may damage electrical cord.
• Dry place for tool and operator. Do not use the
tool while standing in water.
• Flammable liquids, vapors, dust or any combustible
materials that may ignite.
2. Position RT-175 Soldering Gun near the copper tub-
ing that is to be soldered.
3. Make sure ON/OFF switch is OFF and uncoil cable
completely from carrying case.
4. When plugging the Soldering Gun into the electrical
outlet, making sure to position the power cord along
the clear path selected earlier. If the power cord
does not reach the outlet, use an extension cord in
good condition.
To avoid electric shock and electrical fires,
never use an extension cord that is damaged or does not
meet the following requirements:
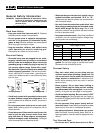
• The cord has a three-prong plug similar to shown
in Electrical Safety section.
• The cord is rated as “W” or “W-A” if being used
outdoors.
• The cord has sufficient wire thickness (14 AWG
below 25′/12 AWG 25-50′). If the wire thickness is
too small, the cord may overheat, melting the cord’s
insulation or causing nearby objects to ignite.
To reduce risk of electrical shock, keep
all electrical connections dry and off the ground. Do
not touch plug with wet hands.
Operating Instructions
WARNING
To reduce risk of electrical shock, keep all elec-
trical connections dry and off the ground. Do not
touch plug with wet hands.
Carbon tips and sleeves become hot during use.
Avoid contact with skin as burns can result.
Keep carbon tips and sleeves away from com-
bustible materials or articles that can be dam-
aged by heat.
Tool Inspection
WARNING
To prevent serious injury, inspect your electric
soldering gun. The following procedures should
be followed.
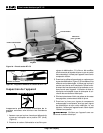
1. Make sure soldering gun is unplugged and the control
switches are in the OFF position (Figure 2).
2. Inspect the power cord and plug for damage. If the
plug has been modified, is missing the grounding
prong or if the cord is damaged, do not use the tool
until the cord has been replaced.
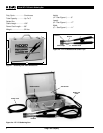
3. Inspect the cables and carbon tips for damage (Figure
2). If cable or tips are damaged, do not use the sol-
dering gun until they are replaced. Only use soldering
sleeves and carbon tips provided with the unit.
Incorrect sleeves or tips may result in overheating of
the wires.
4. Clean any oil, grease or dirt from handles, controls
and clamps.
5. Inspect the soldering gun for any broken or missing
parts as well as damage to the metal enclosure. If any
of these conditions are present, do not use the tool
until any problem has been repaired.
Do not operate unit with electrical box
cover removed.
Tool and Work Area Set-Up
WARNING
To prevent serious injury, proper set-up of the
tool and work area is required. The following pro-
cedures should be followed to set-up the Soldering
Gun.
1. Check work area for:
• Adequate lighting
Ridge Tool Company 5
Model RT-175 Electric Soldering Gun
WARNING
WARNING
WARNING


