


-10-
Service
Preventive maintenance
performed by unauthorized
personnel may result in misplacing of
internal wires and components which could
cause serious hazard. We recommend that
all tool service be performed by a
Rotozip/Bosch Factory Service Center or
Authorized Rotozip/Bosch Service Station.
TOOL LUBRICATION
Your Rotozip tool has been properly lubricated
and is ready to use.
BEARINGS
After about 75-100 hours of operation, or at
every second brush change, the bearings
should be replaced at Bosch Factory Service
Center or Authorized Bosch Service Station.
Bearings which become noisy (due to heavy
load or very abrasive material cutting) should
be replaced at once to avoid overheating or
motor failure.
CARBON BRUSHES
The brushes and commutator in your tool have
been engineered for many hours of
dependable service. To maintain peak motor
efficiency, we recommend the brushes be
examined every two to six months. Only use
genuine Rotozip replacement brushes
specially designed for your tool.
If your tool runs sporadically, loses power,
makes unusual noises, or runs at a reduced
speed, check the brushes. Continuing to use
the tool in this condition will permanently
damage the motor.
Do not attempt to operate the tool with
broken, missing, or loose brush doors. If
the brush doors or brush door screws become
lost or damaged, please contact Rotozip
Customer Service for replacement parts.
To Replace the Brushes
1. Disconnect the tool from the power supply.
2. Each door is held in place by a screw.
Using a screwdriver, loosen the screw by
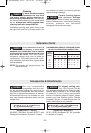
rotating it counter-clockwise (Fig. 1). Be careful
not to lose the screw.
3. Using your fingernail, pry the brush door
loose and remove it from the tool.
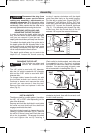
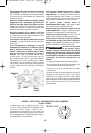
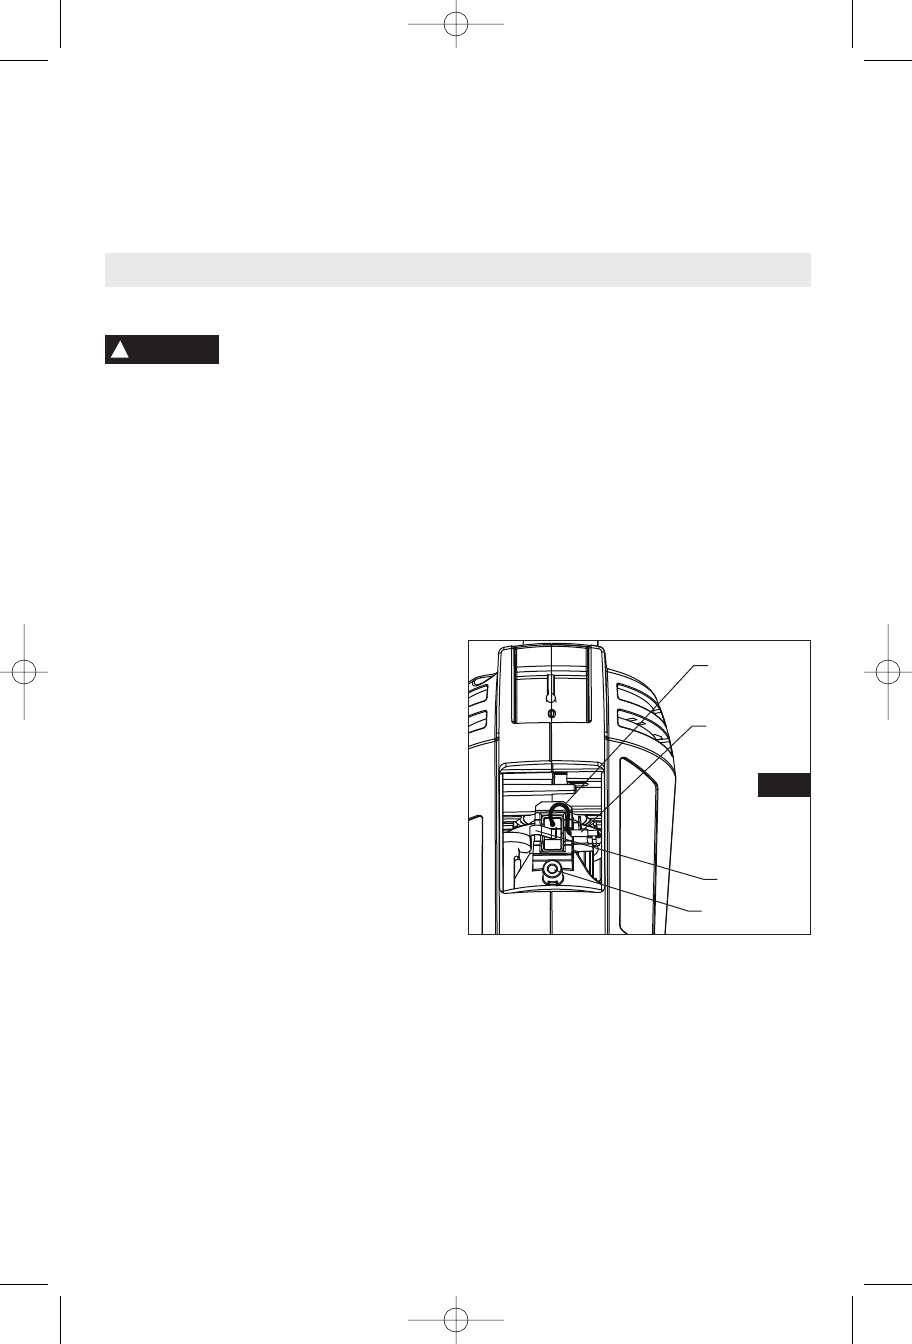
4. In order to remove the brush, you must pull
back the spring that is holding the brush in
place. Using needle nose pliers, carefully pull
back the end of the brush spring and place it to
the side of the brush near the hole for the
brush door screw. Once the spring has been
moved, you can remove the brush by pulling
on the brush wire connector (Fig. 11). Be
careful not to bump the brush spring or
damage the brush wire connector. Make a
note of which side of the tool the brush was
removed.
5. Check both brushes. The brushes in your
Drywall Router will not wear at the same rate.
If either brush is less than 3/16" (4.8mm) long
or the worn end of the brush is rough or pitted,
replace both brushes. Place the new brush in
the brush holder, making sure the brush wire is
securely connected to its terminal inside the
tool. Fold the brush wire away from the screw
hole as shown. Place the end of the spring into
its original position.
6. Replace the brush doors. Be careful not to
over-tighten the brush door screw.
Maintenance
!
WARNING
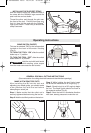
THE DRYWALL ROUTER ONLY COUNTER-
CLOCKWISE to take advantage of the
“hugging” action of the bit along the contours
of the template. Remember to use a smooth,
continuous motion. The exception to this rule
applies to cutting window and door openings.
Since you are tracing around the inside of the
framing members, move the bit clockwise to
take advantage of the bits “hugging” action.
FIG. 11
SPRING
BRUSH WIRE
CONNECTOR
BRUSH
WIRE
SCREW HOLE
RZ 2610955525 10-07 10/11/07 8:19 AM Page 10