


11
OPERATION
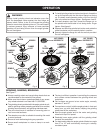
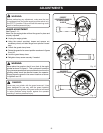
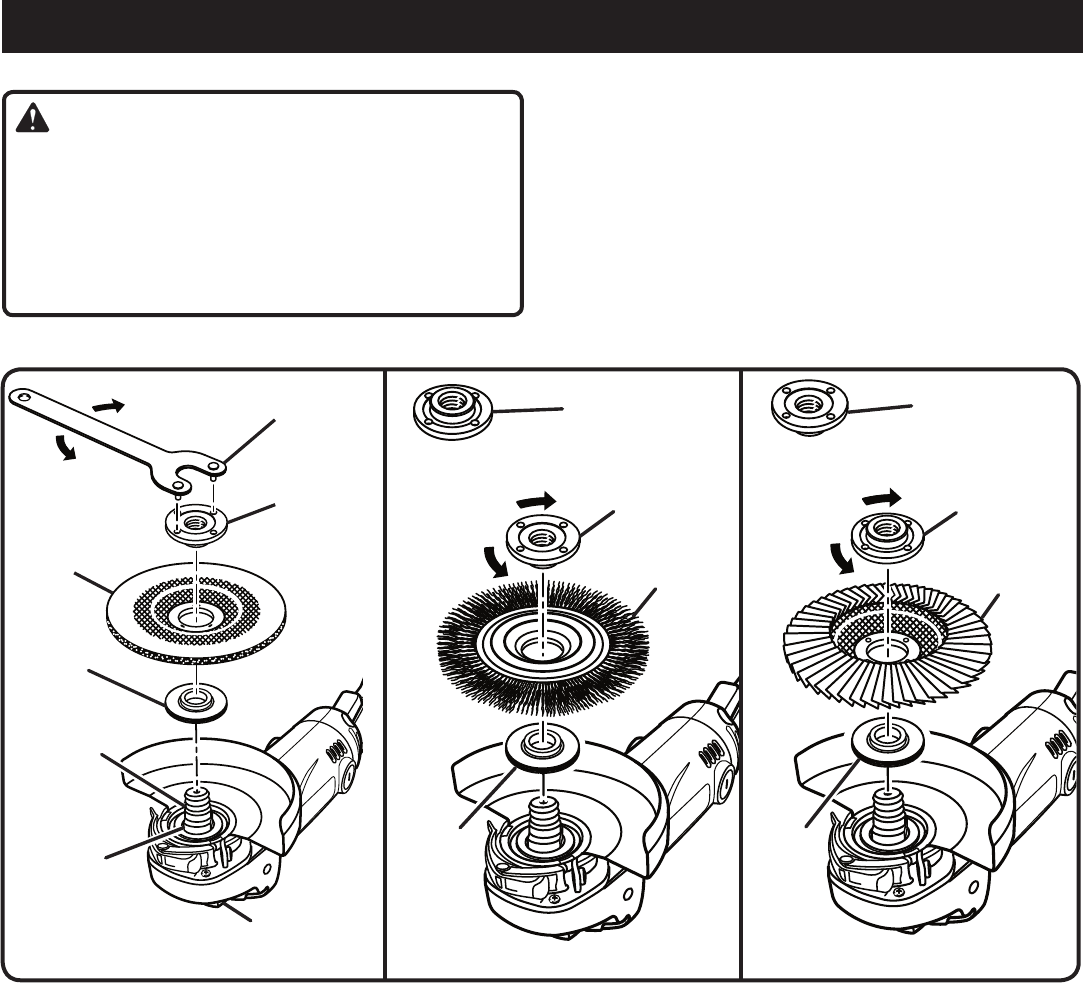
WARNING:
Always install grinding wheel and abrasive mop disc
with the depressed center against the disc flange as
shown below. Failure to do so will cause the grinding
wheel to crack when tightening the nut. This could result
in serious personal injury because of loose particles
breaking off and being thrown from the angle grinder.
Do not overtighten.
FLANGE
NUT
GRINDING
WHEEL
DISC
FLANGE
SPINDLE
SPINDLE
LOCK
FLAT(S)
WRENCH
TO
TIGHTEN
TO
LOOSEN
Fig. 4
FLANGE NUT
TURNED
CORRECTLY
NUT TURNED
INCORRECTLY
TO
TIGHTEN
TO
LOOSEN
WIRE
WHEEL BRUSH
Fig. 5
NUT TURNED
INCORRECTLY
DISC
FLANGE
FLANGE NUT
TURNED
CORRECTLY
TO
TIGHTEN
TO
LOOSEN
ABRASIVE
MOP DISC
DISC
FLANGE
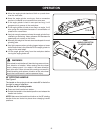
Fig. 6
To install grinding wheel and wire wheel brush, thread the
nut on the spindle with the flat side of flange nut facing
up. Fit raised, small diameter portion of the nut into the
hole in the wheel and finger tighten. See figures 4 and 5.
To install abrasive mop disc, thread the flange nut on
the spindle with the flat side of nut facing down. Finger
tighten. See figure 6.
Depress and hold the spindle lock button and rotate the
wheel clockwise until the spindle locks in position.
Securely tighten the flange nut with the wrench provided.
Do not overtighten.
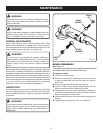
GRINDING, SANDING, BRUSHING
See Figure 7.
Always carefully select and use grinding wheels that are
recommended for the material to be ground.
Make sure the minimum operating speed of any acces-
sory wheel selected is not less than 11,000 RPM.
The grinding wheel provided with the angle grinder is suit-
able for grinding welds, preparing surfaces to be welded,
grinding structural steel, and grinding stainless steel.
The wire wheel brush is suitable for removing paint or
rust from metal surfaces.
The abrasive mop disc is suitable for sanding flat metal
or wood surfaces.
Secure all work before beginning any operation.
Secure small workpieces in a vise or clamp to a work-
bench.
The key to efficient operation is controlling the pressure
and surface contact between the grinding wheel and
workpiece.
Flat surfaces are ground at an acute angle, normally
between 5° and 15°.
For maximum control, hold the angle grinder in front and
away from you with both hands, keeping the grinding
wheel clear of the workpiece.
Start the angle grinder and let the motor and grinding
wheel build up to full speed.
Gradually lower angle grinder until the grinding wheel
contacts the workpiece.
For best results keep the angle grinder tilted at an angle
from 5° to 15° and continuously moving at a steady,
consistent pace.