


14
MAINTENANCE
Fig. 13
Fig. 14
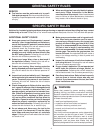
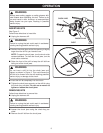
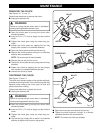
REMOVING THE CHUCK
See Figures 12, 13, and 14.
Follow these directions to remove the chuck.
■ Unplug the hammer drill.
WARNING:
Failure to unplug the tool could result in accidental
starting causing possible serious injury.
■ Open the chuck jaws by turning the chuck collar
counterclockwise.
■ Insert a 5/16 in. (7.9 mm) or larger hex key into the
chuck.
■ Tighten the chuck jaws using the chuck key pro-
vided.
■ Loosen the chuck screw by tapping the hex key
sharply with a mallet in a clockwise direction.
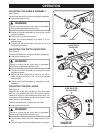
■ Open the chuck jaws and remove the hex key.
■ Remove the chuck screw by turning it in a clockwise
direction with a screwdriver.
NOTE: The screw has left hand threads.
■ Reinsert the hex key into the chuck.
■ Tighten the chuck jaws securely using the chuck key
provided.
■ Loosen the chuck by tapping the hex key sharply
with a mallet in a counterclockwise direction.
■ Unscrew the chuck by hand.
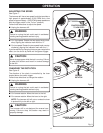
TIGHTENING THE CHUCK
See Figures 12 and 13.
The chuck may become loose on the spindle and begin
to shake when using the drill. Also, the chuck screw may
become loose causing the chuck jaws to bind and
prevent them from closing.
Follow these directions to tighten the chuck.
■ Unplug the hammer drill.
WARNING:
Failure to unplug the tool could result in accidental
starting causing possible serious injury.
■ Open the chuck jaws by turning the chuck collar
counterclockwise.
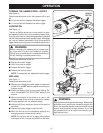
■ Insert a 5/16 in. (7.9 mm) or larger hex key into the
chuck.
■ Tighten the chuck jaws using the chuck key pro-
vided.
■ Tap the hex key sharply with a mallet in a clockwise
direction to tighten the chuck on the spindle.
■ Open the chuck jaws and remove the hex key.
■ Tighten the chuck screw by turning it in a counter-
clockwise direction with a screwdriver.
NOTE: The screw has left hand threads.
Fig. 12
SCREWDRIVER
MALLET
CHUCK
HEX KEY
CHUCK JAWS
MALLET
CHUCK
HEX KEY
CHUCK
JAWS