


14
MAINTENANCE
LUBRICATION
All of the bearings in this tool are lubricated with a suffi-
cient amount of high-grade lubricant for the life of the
unit under normal operating conditions. Therefore, no
further lubrication is required.
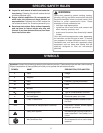
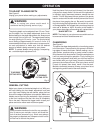
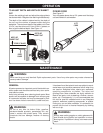
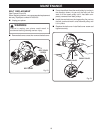
CLEANING CHIP EXHAUST AND
EMPTYING CHIP BAG
See Figure 16.
After using your planer for an extended period of time or
when planing wet or green lumber, chips may build-up
in the chip exhaust port and require cleaning. Chip build-
up restricts air flow and causes the motor to overheat.
■ Unplug your planer.
WARNING:
Check extension cords before each use. If damaged
replace immediately. Never use tool with a
damaged cord since touching the damaged area
could cause electrical shock resulting in serious
injury.
EXTENSION CORDS
The use of any extension cord will cause some loss of
power. To keep the loss to a minimum and to prevent
tool overheating, use an extension cord that is heavy
enough to carry the current the tool will draw.
A wire gage size (A.W.G.) of at least 16 is recommended
for an extension cord 100 feet or less in length. When
working outdoors, use an extension cord that is suitable
for outdoor use. The cord's jacket will be marked WA.
Fig. 16
WARNING:
Failure to unplug your planer could result in
accidental starting causing serious injury.
■ Remove the chip bag from the chip exhaust.
■ Clean the chip or dust build-up from the chip exhaust
port of your planer with a small piece of wood. Do not
use your hands or fingers.
■ Empty all chips from the chip bag and ensure collar
is free from debris.
■ Replace chip bag.
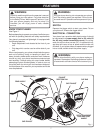
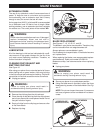
BLADE REPLACEMENT
See Figures 17, 18, 19, 20, 21, and 22.
The blades in your planer are reversible. Therefore, they
can be reversed when one edge becomes dull.
Always replace or reverse blades in pairs.
Do not attempt to sharpen blades. If the blades become
dull, replace them.
When replacing the blades, use recommended replace-
ment blade only, Ryobi part number HPL50K-26.
Blades are sharp, use extreme caution when replacing
blades.
■ Unplug your planer.
WARNING:
Failure to unplug your planer could result in
accidental starting causing serious injury.
■ Secure your planer in an upside down position.
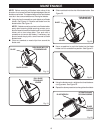
■ Using the blade wrench provided, loosen the three
blade securing screws on the blade holder.
See Fig-
ure 17
.
NOTE: Do not over loosen the screws. If screws are
too loose, alignment of the new blade will not be ac-
curate.
Fig. 17
BLADE WRENCH
BLADE
SECURING
SCREWS
CUTTER HEAD
LOOSEN BLADE
SECURING SCREWS