


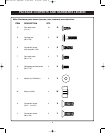

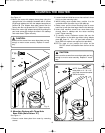

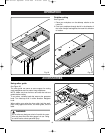

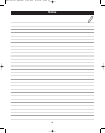

Ta ble flatness adjustment
See Figure 16
Your router table comes equipped with an “L” bracket
mounted under it to help ensure the flatness of the
working surface. If the router table should ever become
warped, the flatness can be adjusted by shimming under
the “L” bracket. Loosen “L” bracket mounting screws and
place shims as necessary. Tighten the “L” bracket screws
securely. Check table top flatness with a straightedge or
the edge of a carpenters square.
Fig. 16
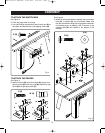
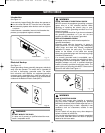
OPERATION
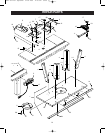
Connecting a Vacuum
A hole is provided under the safety shield that will accept
standard 1-1/4" vacuum hose connections. (For some
shop vacuums, an adapter must be purchased.) If the
vacuum is plugged into the switch box, it will turn ON and
OFF simultaneously with the router.
16
WARNING:
Do not use a router bit with a diameter greater than
1-1/4". Consult your router manual for the maximum
size of router bit allowable.
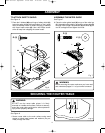
Using your router/router table
WARNING:
Before you start work with your new router table: Refer
to your router owner's manual to see how the height of
the cut can be adjusted.
WARNING:
Make sure router is unplugged before starting
depth/height adjustments.
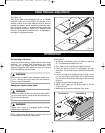
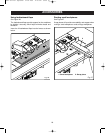
See Figure 17
1. At the end of the board, use a soft pencil to mark line
#1. This indicates the depth of the cut.
2. Then mark line #2, indicating the height of the cut.
3. Place your board so that it is snug against the right
fence face. The end with lines #1 and #2 should be near
the bit.
4. Loosen the right fence clamping knobs enough so you
can move the fence easily. Move fence and board so
that the board contacts the outer edge of the router bit
at line #1.
5. Tighten the right fence clamping knobs.
6. Adjust router height so the cutting edge of the bit
contacts line #2.
7. Make sure bit is securely tightened in the collet.
Fig. 17
Pencil line #1 Pencil line #2
NOTE: Using scrap board that is smooth and true is
recommended for making this adjustment.
Bdal 6144.461 3Sprachen 04.06.2005 11:56 Uhr Seite 16