


Page 30
OPERATION
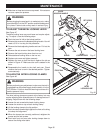
■ Move the bevel locking lever to the right for angle mode.
Turn the blade adjustment handle until the bevel indicator
is at the desired angle. Push the bevel locking lever
securely to the left to lock the angle.
■ Position the rip fence the desired distance from the blade
for the cut and lock securely.
■ Place a support (the same height as saw table) behind the
saw for the cut work.
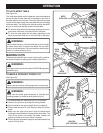
■ Use a push stick to move small pieces of wood past the
blade. Never push a small piece of wood into the blade
with your hand.
■ Stand to the side of the wood as it contacts the blade to
reduce the chance of injury should kickback occur. Never
stand directly in the line of cut.
■ Make sure the wood is clear of the blade before turning on
the saw.
■ Let the blade build up to full speed before feeding the
workpiece into the blade.
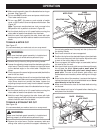
TO MAKE A COMPOUND MITER CUT
This cut is made with both the miter fence and the blade
angled. Set the miter fence and the blade angle with the
procedures given earlier.
The miter fence must be on the left side of the blade. It is
highly recommended that you test the cut with a piece of
scrap wood. Become thoroughly familiar with bevel cross
cuts and miter cuts before attempting to perform a com-
pound miter cut.
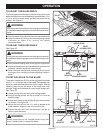
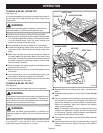
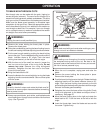
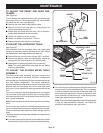
TO MAKE A LARGE PANEL CUT
See Figure 41.
Make sure the saw is properly secured to a work surface so
it will not tip over under the weight of a large panel.
WARNING:
Make sure the blade guard assembly is installed and
working properly to avoid serious personal injury.
■ Raise the locking handle on the rip fence to allow the rails
to move freely.
■ Lift off the sliding miter table assembly by raising the miter
locking clamps to release the grippers.
■ Remove the accessory table by swinging out the lever
and lifting the table up and out.
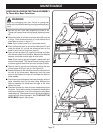
■ Rotate the front rail clamps (under the front rail) to the left
and slide the front rail to the side where the panel will rest.
Lock the rail clamps after positioning the front rail.
■ Rotate the rear rail clamps (under the rear rail) to the left
and position the rear rail to support the panel. Align the
rear rail with the front rail. Lock the rail clamps after
positioning the rear rail.
■ Place the accessory table onto the rails far enough from
the blade to help support the panel and lock securely.
■ Place the sliding miter table assembly onto the rails and
lock securely. The miter table can be rotated 180° so the
projecting base is at the back of the work surface so you
won't run into it as you feed the panel into the blade.
(Tables can be placed on either side of blade.)
■ Position the rip fence the desired distance from the blade
for the cut and securely lock the handle.
■ Place a support behind the saw for the cut work.
■ Make sure the panel is clear of the blade before turning on
the saw.
■ Let the blade build up to full speed before feeding the
workpiece into the blade.
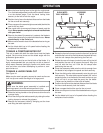
Fig. 41
MITER
LOCKING CLAMPS
ACCESSORY
TABLE
ACCESSORY
TABLE
RAIL CLAMP
SLIDING MITER
TABLE ASSEMBLY