


11
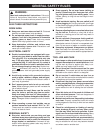
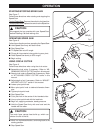
STARTING/STOPPING SPEED SAW
See Figure 7.
Follow these directions when starting and stopping the
Speed Saw.
To start Speed Saw: Depress the switch to the I position.
To stop Speed Saw: Depress the switch to the O position.
CAUTION:
We suggest that you practice with your Speed Saw
before installing a bit and making cuts.
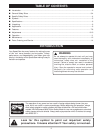
OPERATING SPEED SAW
See Figure 8.
Follow these directions when operating the Speed Saw.
■ Hold Speed Saw firmly with both hands.
■ Start Speed Saw.
■ Tilt Speed Saw at a 45
o
angle.
■ Plunge bit into material using guide ring as a pivot.
■ Raise Speed Saw slowly to a 90
o
angle.
■ Begin cutting.
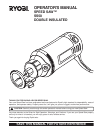
USING CIRCLE CUTTER
See Figure 9.
Follow these directions when using the circle cutter.
■ Assemble circle cutter if necessary. Refer to “AS-
SEMBLING CIRCLE CUTTER” earlier in this manual.
■ Attach circle cutter to Speed Saw if necessary. Refer
to “ATTACHING CIRCLE CUTTER” earlier in this
manual.
■ Adjust depth of cut if necessary. Refer to “ADJUST-
ING DEPTH OF CUT” earlier in this manual.
■ Loosen pivot point knob.
■ Move pivot point knob to desired diameter dimen-
sion.
■ Tighten pivot point knob.
■ Start Speed Saw.
■ Cut a pilot hole in the center of the intended circle.
■ Line up pivot point knob with the lead hole.
■ Begin cut, applying moderate, steady pressure.
■ Hold the Speed Saw firmly with one hand and the
handle with the other.
CAUTION:
Too much force causes heat build up, which can
shorten the life of the bit.
■ Work in a clockwise direction, continuing back to the
starting position.
■ Stop Speed Saw.
Fig. 9
Fig. 8
OPERATION
Fig. 7
ON (|)
OFF (O)