


• 8 •
DESULFATION MODE:11.5 If a battery is left discharged for an extended
period of time, it could become sulfated and not accept a normal charge.
The CHARGING LED will blink when the special desulfation mode is ac-
tivated. When blinking, the charger has switched to the Desulfation Mode
of operation. If successful, normal charging will resume after the battery is
desulfated. The CHARGING LED will then stop blinking and light continu-
ously. Desulfation could take up to 10 hours. If desulfation fails, charging
will abort and the CONNECTED LED will remain lit and the display will
read BAD BAT.
COMPLETION OF CHARGING: 11.6 Charge completion is indicated by the
CHARGED LED. When lit, the charger has stopped charging and has
switched to Maintain Mode of operation.
MAINTAIN MODE:11.7 When the CHARGED LED is lit, the charger has
started Maintain Mode. This mode of operation is known as Float-Mode
Monitoring. In this mode, the charger keeps the battery fully charged by
delivering a small current, when necessary. The voltage is maintained at a
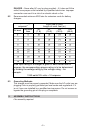
level determined by the BATTERY TYPE selected. To nish the charging
cycle press the START/STOP button, and the OFF LED will light.
GENERAL CHARGING NOTES:11.8
The fan runs whenever one or more batteries are being charged.
If the charge mode is changed after charging has started (by pressing the
BATTERY TYPE button), the charging process stops.
The voltage displayed during charging, is the charging voltage and usually
will be higher than the battery’s resting voltage.
USING THE VOLT METER TO TEST BATTERY STATE OF CHARGE12.
OVERVIEW12.1
The charger has a built in volt meter to test your battery’s state of charge.
The charger does not have a built in load tester. As such, a recently
charged battery could have a temporarily high voltage due to what is
known as “surface charge”. The voltage of such a battery will eventually
drop during the period immediately after the charging system is disen-
gaged. Consequently, the tester could display inconsistent values for such
a battery. For a more accurate reading, the surface charge should be
removed by temporarily creating a load on the battery by turning on the
lights or other accessories.
The battery tester is only designed to test 12V batteries. Testing a device
with a rapidly changing voltage could yield unexpected or inaccurate
results.
TESTING SEQUENCE:12.2 There are three basic steps required to test the
battery state of charge:
Connect the battery charger’s clips to the battery. Be sure to follow all 1.
of the precautions listed under sections 6 and 7.