


11
OVERVIEW
The 10000A has an engine start
function that can be used to jump start
your vehicle if the battery is low by
providing 100 amps of current to assist
engine cranking.
STARTING SEQUENCE
There are a few basic steps involved
when using the engine start function.
1. Connect the charger battery clamps
to the battery or charging system. Be
sure to follow all of the precautions
listed under “OPERATING INSTRUC-
TIONS”.
2. Connect the charger power cord to a
120 VAC outlet. Again, be sure to
follow all of the precautions listed
under “OPERATING INSTRUC-
TIONS”.
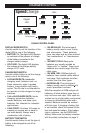
3. Press the CHARGE RATE button
until the 100A START indicator is lit.
4. Crank the engine until it starts or 5
seconds passes.
5. If the engine did not start, wait for the
charger to cool then repeat step 4.
During the starting sequence listed
above, the charger is set to one of three
states.
1. Wait for cranking - The charger
waits until the engine is actually
being cranked before delivering 100
amps for engine start. The charger
delivers charge at a rate of 20 amps
while waiting and will reset if the
engine is not cranked within 5
minutes. (If the charger resets, it sets
itself for a 2A charge and 12V
REGULAR battery.) While waiting for
cranking, the digital display shows
the battery voltage (it can’t be set to
percent).
USING YOUR ENGINE STARTER
2. Cranking - When cranking is
detected, the charger will automati-
cally deliver up to its maximum
output (at least 100A) as required by
the starting system for up to 5
seconds or until the engine cranking
stops. The digital display shows a
countdown of the remaining crank
time in seconds. It starts at 5 and
counts down to 0.
3. Cool Down - After cranking, the unit
enters a mandatory 2-minute (120
second) cool down state. During this
period, no settings can be changed.
The buttons are ignored. The digital
display indicates the remaining cool
down time in seconds. It starts at
120 and counts down to 0. The 100A
START LED blinks once every
second. During the cool down period,
the charger delivers charge at a rate
of 20A and the CHARGING LED is lit.
After 2 minutes, the 100A START
LED will stop blinking and will light
continuously, indicating that another
crank cycle can be started. The
digital LED will change from display-
ing the countdown back to displaying
the battery voltage.
ENGINE STARTING NOTES:
• If the battery is disconnected during
the cool down period, the charger will
reset.