


3
BATTERY CHARGER CONTROLS
READING METER:
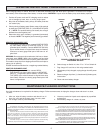
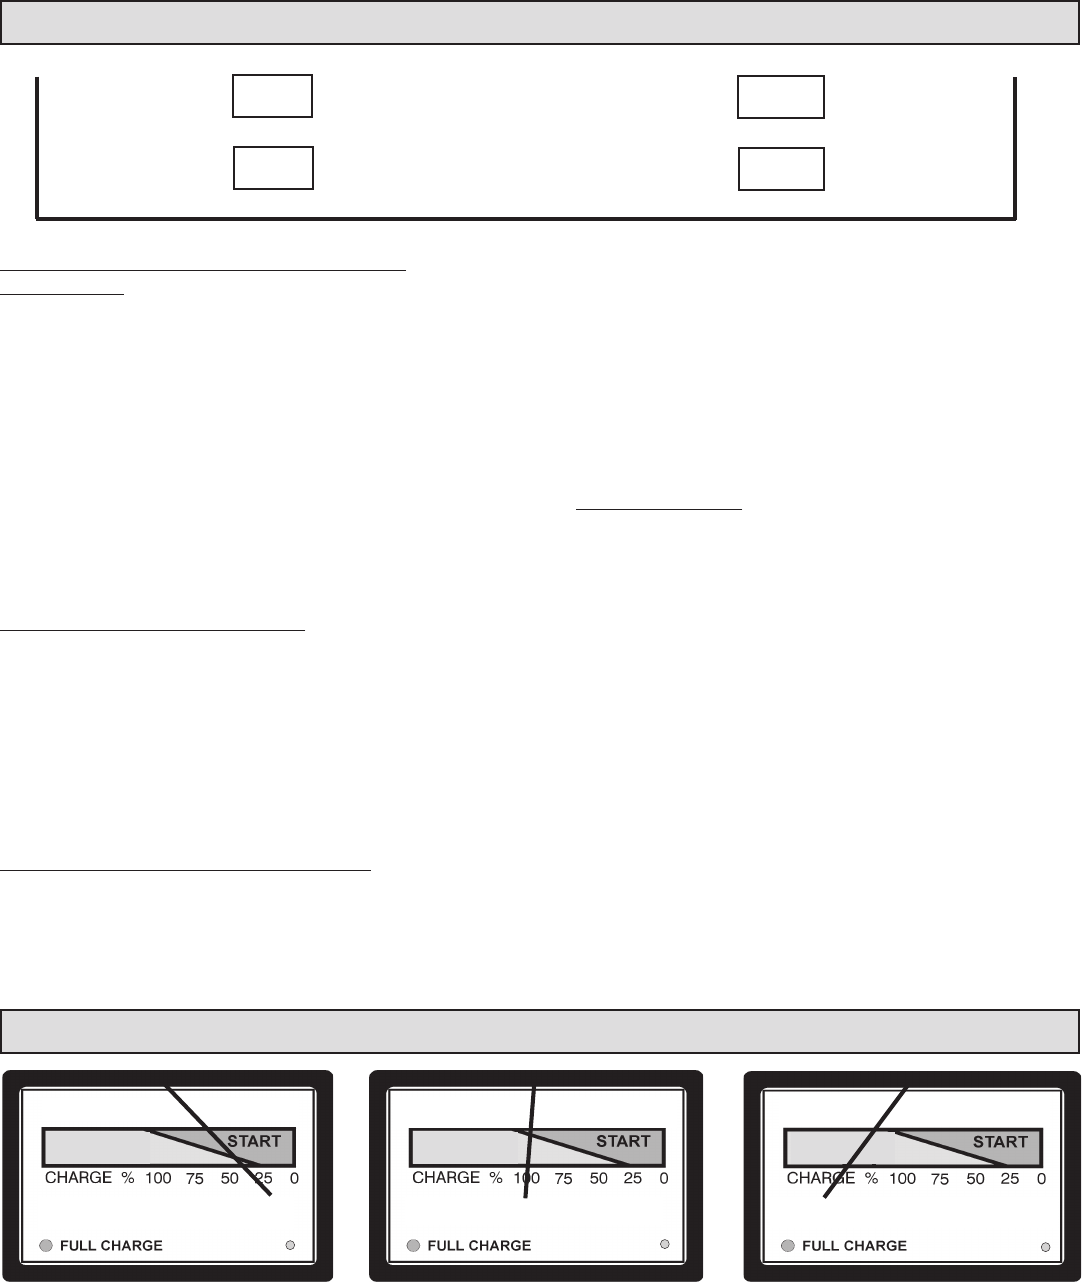
FIGURE 5. FULLY CHARGED BATTERY
charge current to the battery is 0 Amps
and the green LED is on.
POWER ON
POWER ON
POWER ON
THIS CHARGER OFFERS 3 ACTIVE MODES OF
OPERATIONS: 2 & 12 Amp and Engine Start
Modes 1 and 2 are selected by switch #2, both offer automatic
charging. Mode 1 offers a 2 Amp charge rate for 12 volt batteries.
Mode 2 offers a 12 Amp charge rate for 12 volt batteries. (For
modes 1 and 2, Switch #1 must be in "Charge").
Mode 3 offers 75 Amps, selected by Switch #1, to assist in
engine cranking of 12 volt systems. Do not use for crank starting
of 6 volt systems, doing so will cause over loading and may
result in permanent damage to the charger. Use the 75 Amp
position for crank starting automobiles and light trucks. Use only
in combination with a battery in the vehicle. This will reduce the
chance of damaging sensitive electronic equipment in the vehicle.
AUTOMATIC CHARGING (12 Amps)
When the battery reaches the full charge state, charge current
is turned off and the charger switches to the maintainer mode of
operation. This action occurs when the ammeter tapers down to
approximately 6 Amps. In this state the battery voltage is
constantly being monitored. When the battery voltage drops to
a predetermined value, charge will turn on for a few seconds
replacing the small amount of energy that was lost while the
charge current was at 0 Amps.
METER / LED INDICATOR (12 Amp Setting)
The meter gives a reading of the percentage of charge on the
battery while charging. The charge current will gradually taper
down as the battery approaches full charge. As the charge current
tapers, the meter needle will also move down from 25% towards
100%.
When fully charged, the meter needle will suddenly drop to 0
and a green LED will turn on. The 0 is not printed on the meter
scale, the LED is located in its place. The 2 amp setting does
not show on the meter.
NOTE: As the battery approaches the full charge state the meter
needle and LED will fluctuate back and forth between CHARGED
and CHARGING. For the average size automotive battery, allow
5 to 10 minutes for the battery to stabilize.
ENGINE STARTING
1. Connect and disconnect the battery charger following the
instructions given for charging a battery in a vehicle.
2. Charge the battery for 10 minutes before cranking the engine.
This allows you the benefit of drawing current from both the
battery and the charger. The average automotive requires
from 200 to 500 Amps for cranking.
3. Select the 75 Amp Start position and crank the engine.
4. If the engine fails to start, recharge the battery for 10 minutes
or longer and try again. If after several repeated tries the
engine fails to start, a problem may lie elsewhere with the
vehicle.
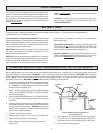
FIGURE 4. FULLY DISCHARGED
BATTERY, 12 Amp Setting
FIGURE 6. APPROACHING FULL
CHARGE, 12 Amp Setting
FIGURA 5. BATERIA A PLENA CARGA
Corriente de carga batería está a 0
amperios y la LED verde se enciende
FIGURA 4. BATERIA TOTALMENTE
DESCARGADA. Tipo 12 amperios
FIGURA 6. ACERCANDOSE A
PLENA CARGA. Tipo 12 amperios
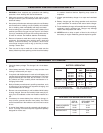
#1
OFF
12 Voltios 12 Voltios
2 Amperios 12 Amperios
SWITCH
#1
OFF
Interruptor
#2
SWITCH
#2
Interruptor
CONTROLES DEL CARGADOR DE BATERIAS
75 Amperios
Arranque a Apagado
Charge
(Select Rate )
12 Volt 12 Volt
2 AMP 12 Amp
Carga
▲
(Selector de Proporción )
▲