


3
B. FASTENING THE PSI-2000 TO A FLAT SURFACE
For convenience, the PSI-2000 can be
fastened to a at surface, horizontally or
vertically. The area where the inverter
is to be fastened must be dry, well ven-
tilated and away from any combustible
products or fumes.
1. Turn off the PSI-2000.
2. Place the back of the PSI-2000
with the mounting bracket against
a secure and at surface.
3. Attach the inverter to the at surface
using corrosion resistant screws.
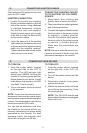
INVERTER FEATURES:
A. ON/OFF Rocker Switch – Turns
inverter on and off.
B. LED Indicator Light – (Green = power
ON, Red = Overload, interruption in
power).
C. Two, 110V GFCI AC Outlets
D. Two Pairs, 12-Volt Power Cords
E. Two, High Speed Cooling Fans –
keeps inverter cool. The speed
of the fan is faster as the load
increases. Fan does not run when
inverter turned off.
F. Analogic Output Power Display -
shows 110V AC continuous power
consumed.
G. Two, Positive Battery Cable
Terminals (Red) – accepts positive
connector cable.
H. Two, Negative Battery Cable
Terminals (Black) – accepts negative
connector cable.
I. Ground Terminal – grounds inverter
to reduce electrical shock.
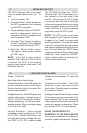
C. GROUNDING THE PSI-2000
To avoid electrical shock, it is neces-
sary to ground the PSI-2000 Inverter
as well as the device powering it. The
inverter should be grounded using #8
AWG copper wire (not included).
NOTE: Do not turn on the inverter or the
power source until the inverter and the
power source are grounded.
1. Turn off the PSI-2000.
2. Locate the chassis ground screw
underneath the negative terminal on
the left side of the inverter. Unscrew
the two hex nuts and one washer.
3. Strip the insulation of the wire back
1.5 inches and in between the two
washers, wrap the bare end of the
#8 AWG copper wires around the
threaded screw extension.
4. Holding the wire in place, screw
the hex nut on the threaded screw
extension and then screw on the
last hex nut to secure the wire
connection.
5. Using the other washer and hex nut,
secure the opposite end of the wire
and attach it appropriately so the
inverter is grounded correctly.
a. Vehicle – connect to the chassis
or unpainted frame part or engine
block of vehicle.
b. Boat – connect to boat grounding
system.
c. Fixed location – connect to a
ground rod or other appropriately
rated ground.